Forums
New posts
Search forums
What's new
New posts
New media
New media comments
New profile posts
Latest activity
New showcase items
New showcase comments
Media
New media
New comments
Search media
Members
Current visitors
New profile posts
Search profile posts
Showcase
New items
New comments
Latest content
Latest reviews
Latest updates
Search showcase
Log in
Register
What's new
Search
Search
Search titles only
By:
New posts
Search forums
Menu
Log in
Register
Install the app
Install
Forums
Non - Specific
Aftermarket Electronics
Custom wiring project
JavaScript is disabled. For a better experience, please enable JavaScript in your browser before proceeding.
You are using an out of date browser. It may not display this or other websites correctly.
You should upgrade or use an
alternative browser
.
Reply to thread
Message
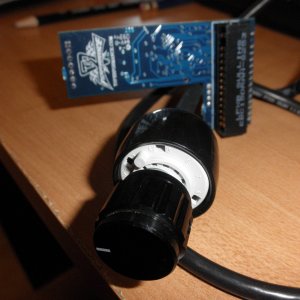
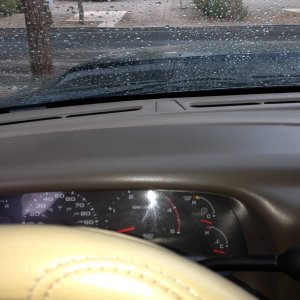
[QUOTE="AlaskanTrucker379, post: 957413, member: 14294"] I've been a member over on the .org for a while now but have just been lurking over at this place. Members here seem to be much more mature and experienced with trucks. I am still somewhat noob when it comes to motors and performance and such so I feel a little out of place I suppose. I decided that maybe I could at least impress some of you guys with this project I am taking on in my E99 7.3. Maybe even teach you all something for a change! This is just a beginning. I will be updating this thread as I get more and more finished. I'm very particular about wiring. When I see someone that uses wire nuts, or those stupid scotch locks everywhere it just makes me want my own wiring job to be absolutely perfect. So that is what I have set out to do. I want room to expand, and want everything to be weatherproof as-well as neat and tidy looking. So here it goes. I started off with a few hundred dollar worth of parts from Waytek wiring. Super cheap prices for high quality products. Too good to be true? Sort of... You must order in bulk. That's why I have so many of each part. Can never have too many though I suppose. [ATTACH=full]132657[/ATTACH] The main important components include a Cooper Bussman Fused power distribution block. It has room for 10 fuses and 5 micro relays. It can supply up-to 80 amps per bus continuously. It is all weather sealed with a cover. [IMG]https://www.ozautoelectrics.com/media/catalog/product/cache/1/image/640x480/5e06319eda06f020e43594a9c230972d/c/o/cooper_bussmann_rmtr_1.jpg[/IMG] Molex MX 150L plugs. I wanted to use plugs so everything could be easily added too, removed, taken out, etc... These seemed up to the job. I chose this model of plugs because they were weather sealed, and also had panel mount receptacles. With the panel mount option, The receptacle could be permanently mounted my "wiring hub thingy" (designed in later pics) for a much neater appearance and easier use. [IMG]http://www.waytekwire.com/images/items/38450FL.gif[/IMG] [IMG]http://www.waytekwire.com/images/items/38452FL.gif[/IMG] [ATTACH=full]132658[/ATTACH] Cole Hearse 100 Amp circuit breaker. This will be the breaker between the battery and the cooper bussman distribution center. The breaker also has a manual trip button so I can easily disconnect the entire distribution block and all aftermarket wiring/accessories from power with a click of a button. That way I don't have to remove the battery ground. [ATTACH=full]132659[/ATTACH] I needed a place to mount everything. I decided that between the core support and the drivers battery would give me: 1. Ample room to mount and work 2. Close to battery (short battery cables) 3. Somewhat near hole in fire wall 4. Somewhat protected from direct salt/water spray 5. Ability to be removed I needed a panel to mount my main Fuse block and all the plugs. Being an Aluminum welder/fabricator has its perks for sure! After a few hours taking measurements and building a drawing in autocad, I was ready to cut. I used the Computerized plasma cutter on a piece of .100 aluminum. It took a few tries to get the fit perfect and all the pieces in optimum locations but I was satisfied with my third go around. [ATTACH=full]132660[/ATTACH] [ATTACH=full]132661[/ATTACH] Main components test fit. Holes still need to be drilled. I will make a template on autocad and print it out so I get the holes in the exact places. [ATTACH=full]132662[/ATTACH] [ATTACH=full]132663[/ATTACH] 35 amp Micro relay in place just for fun. [ATTACH=full]132664[/ATTACH] Roughed into place. [ATTACH=full]132665[/ATTACH] I am now at the stage where I need to mount it to the core support. I want it to be easily removable so I will end up welding on some studs to the aluminum panel. I will then drill and tap the studs so all I have to do is unscrew a couple screws with a philips and unplug my handy dandy molex plugs and the entire aluminum panel comes right out if I every need to service something under neath it or add another circuit for an accessory. Kinda hard to explain so you will have to wait until I can get it done to see what I have in mind. Here is the other half to my wiring endeavor. The cab! Thanks to Tousley Ford, I got an F-650 dash for 17.95 and freight for only ~$10. Score! Cut gauge holes. I could have fit three, but didn't like how close they were to each other so I went with two. I will figure out something to put in the empty space in the future. A carling switch panel was installed after cutting out the top space as well. [ATTACH=full]132666[/ATTACH] [ATTACH=full]132667[/ATTACH] Paint mixed by my local body shop and sprayed with areasol paint spray gun by me, myself, and I! I also had OTRATTW.com make me some custom rocker switches. These guys are awesome! High quality switches with literally any symbol or text you can think of! The top light is on with my dash lights, while the bottom LED is lit when the switch is "on" [ATTACH=full]132668[/ATTACH] Soldered in blue LED's and resistors in the top light socket and Red LEDs in the bottom socket. [ATTACH=full]132669[/ATTACH] Installed. The amp guage is just a place holder. I had it sitting in a drawer from an old A model Kenworth. Eventually I will put a fuel pressure gauge in its place. [ATTACH=full]132670[/ATTACH] This is just the beginning but I will be periodicly updating this thread as I get more and more done. I hope you guys can learn something from me. I like showing off my OCD :) [/QUOTE]
Insert quotes…
Verification
Post reply
Random media
Latest posts
L
For Sale - Carli 2017+ Ford Super Duty Commuter 2.0 (2.5"/3.5" Lift) System
Latest: LaughingSavage
Yesterday at 3:40 PM
2017+ 6.7 Aluminum Super Duty
1
2003 6.0 code P2285
Latest: 1964suicide
Friday at 10:33 PM
6.0 Tech & FAQ
G
2005 F-250 KR CCSB FX4
Latest: Geralddunbar995
Friday at 4:28 PM
Trucks
If you've had a 6.4 crack pistons please read
Latest: ncollins64
Monday at 7:08 PM
6.4 Tech
20% TO 40% OFF ON FORD OEM PARTS
Latest: HeavyAssault
Apr 28, 2024
Sunrise Ford Parts
Members online
GregoryAsses
Forums
Non - Specific
Aftermarket Electronics
Custom wiring project
Top