My Build Thread - 2015 F350 Lariat

6.0 Tech

Well-known member
Joined
Sep 9, 2015
Messages
3,480
Reaction score
100
Location
Mesa, AZ
Forscan can't identify a truck with S p a r t a n tuning. Ask me how I know..

Neither can the ids...

Spart10 apparently screws with an identifier in the pcm, to where the scanners wont recognize the pcm in them.
 

06greenstroker

New member
Joined
May 17, 2016
Messages
61
Reaction score
0
Location
O-H-I-O
Update: 12/22/2016

Wow...was finally able to get outside and get something accomplished on the truck today, albeit it was small. Been either raining, snowing, freezing rain, or just down right too cold to make any progress on it her lately.

Replaced the 4wd front valance with the 2wd version. Simple/easy install other than the stupid plastic snap in plugs. Left them out for now...fingers were too darn cold to mess with them anymore.

I like it, but I'll have to remove those 2 brackets that drop off the frame rails in the front. I'm assuming they are part of the 'plow prep package' i have on the truck. As you can see, they drop below the valance now.

4wd Valance

20161222_163222_zpsqlvz77rd.jpg

20161222_163354_zpss8sx3afb.jpg


2wd Valance

20161222_163427_zpstwjwzaqm.jpg

20161222_163455_zpsw0m0lugd.jpg


Oh, and as you may be able to tell, I did remove the red boots from the steering stabilizers.

Next to do when weather cooperates...

AVS Window Vents
ABS Line Brackets on the radius arms
Truck Bed Lighting
High Idle
and when they come in...running board lights
 

06greenstroker

New member
Joined
May 17, 2016
Messages
61
Reaction score
0
Location
O-H-I-O
Another update for today...

Went ahead and installed the window vents. was going to hold off until Monday when it is supposed to be warmer, but I'm impatient and bored. Used a heat gun to warm things up. I've always had these on any of my trucks in the past, and I tell you what, I've missed it so far on this truck.

20161223_130159_zpsgbw1goir.jpg

20161223_130205_zpss6ahtmvb.jpg


20161223_132521_zpsgvkifc12.jpg

20161223_132527_zpspfeeas5k.jpg


20161223_132533_zps0ybn7gej.jpg

20161223_132542_zpsc3zcnlkn.jpg


One thing I did notice...the front windows would auto retract when they got up to the top, assuming they sense the vent (obstruction) and do so for safety reasons. Is there a way to disable this feature? I haven't looked in forscan to see, I did scroll through the dash display and didn't see anything. Was a bit annoying when I was trying to get these installed and seated at first. I finally kept quickly tapping the window button until I got them up where they didn't auto retract.

That's going to be annoying if I need to do this every time in the future...there has got to be a way to defeat this safety. Anyone know?

Thanks.
 

Ice Cream Sammich

New member
Joined
Nov 7, 2014
Messages
189
Reaction score
0
I know on the F150s, just leave the windows up for a few days. The vents will get seated into the weatherstripping and then the auto up will work fine.
 

06greenstroker

New member
Joined
May 17, 2016
Messages
61
Reaction score
0
Location
O-H-I-O
I know on the F150s, just leave the windows up for a few days. The vents will get seated into the weatherstripping and then the auto up will work fine.

Yah, I youtubed it quickly before I left and seen that if you run it up and leave the switched triggered for like 2 more seconds, then leave it up for like 48 hours, it will 'set' itself. That was an f150 anyhow. I tried that, but once it got up, it retracted even with me keeping the switch triggered. I finally got it fully up and seated somehow, so it will remain that way for a couple days and hopefully it will work. The passenger side gave me some problems right after install, but the wife operated it last night while driving :jawdrop: and luckily it stayed in the channel and the window went back up with no issues. I asked her to not do that again for a few days! :gun:
 

06greenstroker

New member
Joined
May 17, 2016
Messages
61
Reaction score
0
Location
O-H-I-O
Update 12/26/2016

Took care of my ABS cable issue that I had after installing the ReadyLift 3.5 system. This was on my list, but wasn't at the top of it at the time until I went to turn around and when I put the truck in reverse and locked the wheel, I had lights and noises going off because I ripped the plug apart. Hopefully this corrects it.

Passenger Side
20161226_145805_zps72q4lshv.jpg


Driver Side
20161226_145652_zpsohxufut6.jpg

20161226_145714_zpsfdn1vbqy.jpg


As you can see, I have more wire slack on the driver side now (side that pulled apart) I think due to it being yanked apart. I plugged back in and it all seems to be working just fine with no alarms, bells or whistles.
 

06greenstroker

New member
Joined
May 17, 2016
Messages
61
Reaction score
0
Location
O-H-I-O
Update 12/30/2016

Woke up to a little bit of snow this morning
20161230_104252_zpswrcgtwp4.jpg


so decided to hook up these that I've had for about a year now.
20161230_104246_zpsmyvy0rux.jpg


They were originally purchased for my 6.0L to install them in the rear for rear lighting but I never got around to doing it.

Anyhow, I decided best location would be to mount them to either side of the hitch.
20161230_104308_zpswtc1wxdl.jpg

20161230_104320_zps6dnkbgdq.jpg


Punched, pilot hole and drilled the holes for mounting to the hitch.
20161230_110829_zpsyjq766hb.jpg

20161230_110838_zpsrfcyewg3.jpg


Roughed them in, adjusted them and then tightened them down.
20161230_113449_zpsoavbelri.jpg

20161230_113443_zpspgpohkcc.jpg

20161230_113437_zpsqnrcciml.jpg


Decided to not use an upfitter switch for these, so removed some paneling and cut out a hole right under the light switch.
20161230_152906_zpsrmkxpvil.jpg

20161230_152911_zpsqvbqr3rw.jpg


These are relay switched battery power, so that I can use them even if the truck is not on, but, I did not tie into the reverse lights, as I didn't really want them to come on everytime I put the truck into reverse. I would rather like the option to use or not use when in reverse.

Here is another view of them completely installed.
20161230_152921_zpsj8kn9uky.jpg


In reverse with factory reverse lights
20161230_175251_zpsi7c3fi8l.jpg


With the LEDs on
20161230_175258_zpsd392l2sd.jpg

20161230_175332_zpsue4r1uyz.jpg
 

06greenstroker

New member
Joined
May 17, 2016
Messages
61
Reaction score
0
Location
O-H-I-O
Update 1/5/2017

Matched oem 20% tint on the front windows.

Before
20170104_162311_zpsbn8qyhbm.jpg

20170105_105759_zpsgzx1tloo.jpg


After
20170105_115637_zpslip8aghx.jpg

20170105_115623_zpscmsnmtex.jpg


My smoked out cab lights with white LED came in, so those will be installed soon. Will also be receiving interior LEDs shortly as well. Have resistor and potentiometer for the high idle mod. Waiting for a little warmer day to install my running board lights, and waiting on my bed lights to arrive before I begin on that project as well.

Really wish I purchased this truck in the spring time, so I would have had several warm months to do everything I am itching to do!
 

06greenstroker

New member
Joined
May 17, 2016
Messages
61
Reaction score
0
Location
O-H-I-O
Update 1/7/2017

Productive with a few small things today...even though it was 10 degrees out...

Switched out the mirror lens with smoked lens. Didn't go with Recon, went with these. Not as black as Recon but they look fine to me.

https://www.am-autoparts.com/products/side-view-mirrors/AM-1057555223.html
20170107_124731_zpsxulqajqs.jpg


Before
20170107_124507_zps9iodbw1k.jpg

20170107_124516_zpsitew8hbk.jpg


After
20170107_125147_zpsuqhyfstu.jpg

20170107_125153_zpsuc3wflcc.jpg


Also switched out my cab lights with smoke covers and leds. Went with these ones rather than recons as well.

https://www.amazon.com/gp/product/B00WSO1XXO/ref=oh_aui_detailpage_o02_s01?ie=UTF8&psc=1
20170107_125408_zpsrcfbtmfy.jpg


Look good as well for fraction of the cost.

Before
20170107_124502_zpsdvghcfpc.jpg

20170107_124512_zps0zkgabpi.jpg


After
20170107_130627_zpse4pokosw.jpg

20170107_130641_zpschu13zxd.jpg


20170107_191110_zpsm5inag66.jpg

20170107_191122_zpsnldowur3.jpg


Also went and switched out my interior bulbs with LEDs as well. Superbrightled.com One note though...I was told I needed 4 of the Map Light bulb 906 and 1 Dome bulb 578. In fact, all 3 of the rear bulbs take a Dome 578, so I'll need to order 2 more of them.
20170107_192319_zpsjp39wbqm.jpg


Here is before with factory bulbs
20170107_191417_zpsmklrz271.jpg

20170107_191334_zpskskjesz3.jpg


After with LEDs
20170107_192027_zps7hnynr4u.jpg

20170107_192535_zpst1wjcwvx.jpg


Major improvement...don't think the pictures do it justice.

20170107_192515_zpstxk1nwbc.jpg

20170107_192522_zpsh6bsup07.jpg
 

06greenstroker

New member
Joined
May 17, 2016
Messages
61
Reaction score
0
Location
O-H-I-O
Wishing I was not home today sick! :( Just got a package dropped off and wishing I can tear into it now.

20170119_133045_zpsnuwiaesu.jpg

20170119_133219_zpsy8zucn8g.jpg


Suppose it will have to wait until another day when I'm feeling better. Probably after my NL Stage 2 Intake arrives! :rockon: Yeah, nothing better to do on a day home sick than to order some more goodies from No Limit! Awesome to deal with!

While I have been waiting on this to arrive I have however been contemplating on doing this at this time. I have about 34k miles on the truck so still under warranty. Sort of rolling the dice here. I want to for the life of the truck, but don't want to in case I need to go in for warranty. I don't have a standing relationship with any local ford dealers/service dept. (didn't buy this one from a ford dealership) and it's been 12 years since I have bought a ford from a ford dealership tbh. My best angle is my bro-n-law works in the service dept of a ford dealership. :ford: Not a diesel mechanic, but maybe a good enough 'in' so I won't have to fight tooth and nail for warranty coverage not directly related to what is about to go on. :lookaround: :cool:
 

06greenstroker

New member
Joined
May 17, 2016
Messages
61
Reaction score
0
Location
O-H-I-O
Day 2 of being home sick...blah! It was killing me, having some goodies delivered yesterday and today, still feeling like **** and it being in the low 50s. I was optimistic that I'd get started on this project tomorrow, so after lunch, about 12:30pm, I decided to go out and hit the flange bolts with some PB Blaster. At first that was all I was going to do today. But 20 minutes went by and I said screw it, sick or not, my exhaust is being ripped off and the 4" Flo-Pro is getting installed! I went out and started turning a wrench at 1pm.

The bolts from both the front and rear flanges came off easy (perks of having a newer truck that the salt hasn't got to yet). I had just ordered the Lisle exhaust hanger removal tool yesterday from Amazon but it slipped my mind while I began disassembling the stock exhaust. In the process of removing the sensor plugs from the ***, I realized I didn't have that tool yet. Oh well, I'll figure something out.

So after disconnecting all the EGT sensors, Oxygen Sensors and DEF Injection, it was time to tackle the exhaust hangers. I did hit them with PB Blaster when I hit the flange bolts so I was hoping that would with the removal. With a pair of channel locks, they actually came off very easily. I guess I can return the Lisle tool when it arrives.

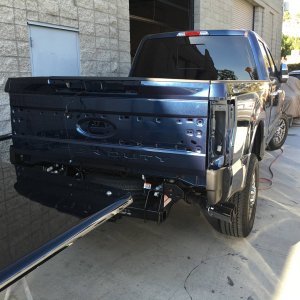
So I then wrestled the 80lb filter out from under the truck. I was able to remove the back section of the stock exhaust no problem without lowering the spare tire like I have read must be done.

20170120_143049_zpssrcrwes4.jpg

20170120_143119_zpsi7yrfurk.jpg


Anyhow, on to figuring out and piecing the new Flo-Pro together.

20170120_144250_zpsp0chwvr3.jpg


Bolted the front flange section first, as the instructions state. Which by the way, I thought were not provided, but it was slipped in between a cardboard tab of the box. Sneaky.

20170120_151958_zpsgszpmmmk.jpg


From there, it was pretty straight forward. Install pieces loosely from front to back. Left all the clamps loose until it was positioned correctly. Once I liked the positioning, started tightening everything up from the back to the front.

20170120_152019_zpsvj0hpykw.jpg

20170120_152032_zpsov7e59g0.jpg

20170120_152055_zpsgwq7euva.jpg


In no time at all, I had the exhaust installed. It was 3:15pm. Only took me a little over 2 hours to rip the old exhaust out and install the new one.

From there, I moved up to the engine bay and just unplugged the 3 EGR plugs for the time being. I'll block the EGR off tomorrow along with sealing and bagging all the plugs under the truck.

20170120_153645_zps8etlsiqu.jpg

20170120_153630_zpsjsxebymo.jpg

20170120_153637_zpse3ygqamx.jpg

20170120_153656_zpszetq9tf9.jpg

20170120_154032_zpsaq9lveat.jpg


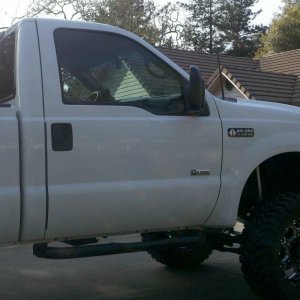
Loaded the Tyrant Street Tune and fired it up. Yeah! I have both the diesel sound and smell back!!! Sounds good and it's really not bad inside the cab. Not nearly as loud as my 6.0 was, that's for sure. Took her for a spin around the country block. Laid into her...man she can go now!

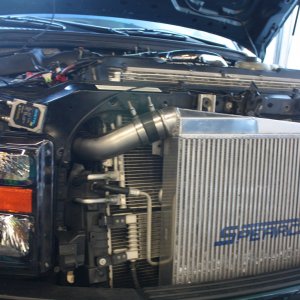
Super excited for the NL Stage 2 Intake now to arrive so I can pair it all together.

I did take before and after videos that I'm trying to load to Youtube and then put on here. I'll post them when they are done loading.

I was getting 14mpg (gauge) before the removal. I'll see how that changes over the next week of driving.

20170120_160758_zpsxlepjggb.jpg
 

06greenstroker

New member
Joined
May 17, 2016
Messages
61
Reaction score
0
Location
O-H-I-O
Last edited by a moderator:

06greenstroker

New member
Joined
May 17, 2016
Messages
61
Reaction score
0
Location
O-H-I-O
Installed the EGR block plates today from No Limit.

20170121_140306_001_zpsrqay94p8.jpg


These are very nicely machined. Only issue I had was no instructions came with the box and there was a small piece of something stuck in one of the bolts

20170121_144805_zpsv0ry0hsr.jpg


Overall thought it was fairly simple install. Began with the removal of the exhaust to egr pipe. The longer of the 2 cross over pipes.

20170121_140319_zps88ufhurc.jpg


Bolts were easy to remove.

20170121_142257_zpsloy5dwrx.jpg


Installed the plates from No Limit reusing the original gaskets.

20170121_142748_zps9r3djrol.jpg

20170121_142744_zpsofkypxx1.jpg


Removed the EGT sensor in the pipe from the EGR Cooler to the Intake and relocated it in the exhaust for the moment. I am awaiting my EGT probe for my SCT Livewire. I will install that there when it arrives.

20170121_143238_zps3wyka5zp.jpg


I then proceeded to remove that pipe.

20170121_143702_zpsq8dmikzi.jpg


Reusing the original gasket for the EGR Cooler side, but using the supplied O-Ring for the intake side, I installed the NL plates.

20170121_145529_zpsd3sf4vqk.jpg


20170121_145537_zps5bhyzqk5.jpg


Also put some Di-Electric Grease on all the plugs under the truck and got them all out of the way.

NL CAI should be arriving sometime this week!
 

06greenstroker

New member
Joined
May 17, 2016
Messages
61
Reaction score
0
Location
O-H-I-O
I like your thread. It's a common mans approach to a new truck.

Thanks. I've always enjoyed threads that show the growth of one's truck, so I decided to make one myself. By no means am I tearing it down to the lifters, or upgrading injectors or turbo (yet :naughty:) but doing what I like for it as time/money permits.
 

Latest posts

Members online

Top