Forums
New posts
Search forums
What's new
New posts
New media
New media comments
New profile posts
Latest activity
New showcase items
New showcase comments
Media
New media
New comments
Search media
Members
Current visitors
New profile posts
Search profile posts
Showcase
New items
New comments
Latest content
Latest reviews
Latest updates
Search showcase
Log in
Register
What's new
Search
Search
Search titles only
By:
New posts
Search forums
Menu
Log in
Register
Install the app
Install
Forums
West Point
The Library
7.3 Performance
ARP Headstud Install How-To
JavaScript is disabled. For a better experience, please enable JavaScript in your browser before proceeding.
You are using an out of date browser. It may not display this or other websites correctly.
You should upgrade or use an
alternative browser
.
Reply to thread
Message
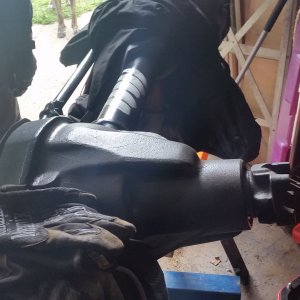
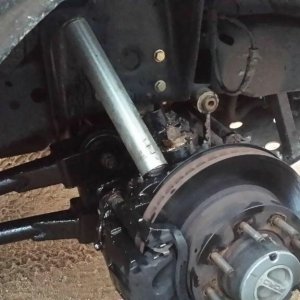
[QUOTE="vanderchevy18, post: 101033, member: 569"] The very first thing I want to point out is this. THERE ARE 2 LENGTHS!! Nowhere will you be told about this. The shorter studs are to be put directly above the injectors. This is so the injector hold downs do not contact the stud. Remember this!! First you will want to remove the injectors and the rocker arm assemblies. Then remove the upper injector hold down bolts using a 5/16 socket. [ATTACH=full]68070[/ATTACH] If you are doing this in truck and without breaking the head gasket, I have a couple pointers. While doing the rear bolts you will need to unbolt the motor mounts and use a jack with a piece of 2x4 to jack up one side of the motor. This will rotate the motor enough to get the bolt out and the stud in. Once the mount nuts are off, place one end of the 2x4 (vertically) on the exhaust manifold. Then put a jack under the other end. Jack it up until the bell housing ALMOST contacts the body. You will want to do this in sequence. One bolt out, one stud in, bolt comes out, stud goes in, etc. Also do it in a couple stages. Go to 90# the first torque until you get all the studs in. Then go back and retorque to 110#. On the third torque go to 125#. Use the torque pattern on the left for the first two torques. Use the pattern on the right for the last torque. Torque the stud to 90# before moving on. [ATTACH=full]68071[/ATTACH] Ok. Now to the bolts. I can't remember the socket size but I think it was a 5/8. You will definitely want to use a craftsman 1/2" drive for this. You may also want to use a cheater. If not, you're more of a man than I! [ATTACH=full]68072[/ATTACH] Once broke loose, they will come right out very easily. Pull the bolt. [ATTACH=full]68073[/ATTACH] Coat the stud you are putting in with plenty of torque compound on both ends. It is provided when you buy the studs for a reason. [ATTACH=full]68074[/ATTACH] Use an allen wrench to screw the stud in. Just go hand snug. [ATTACH=full]68075[/ATTACH] [ATTACH=full]68076[/ATTACH] Now put the washer and nut on provided in the box of studs. (Sorry its upside down. Stupid phone.) [ATTACH=full]68077[/ATTACH] Tighten using the torque specs I provided above. Now replace everything removed for this job. Including but not limited to motor mounts, injectors, rocker arms, valve cover, harness plug, and intercooler piping. Enjoy the added security of having studs!!!! [/QUOTE]
Insert quotes…
Verification
Post reply
Random media
Latest posts
2010 headunit
Latest: glog
Yesterday at 1:17 PM
6.4 Tech
10R140 failure
Latest: Sterling6.7
Tuesday at 8:54 PM
2017+ 6.7 Aluminum Super Duty
D
Turning off the Auxiliary powertrain control module
Latest: donaldtfreeman
Tuesday at 10:43 AM
6.0 Tech & FAQ
4r100 P0715/P0717 trouble codes.
Latest: Tiha
Tuesday at 8:07 AM
7.3 Tech & FAQ
I must be getting old… Exhaust is too loud
Latest: ju015dd
Sunday at 7:59 AM
6.0 Aftermarket
Members online
No members online now.
Forums
West Point
The Library
7.3 Performance
ARP Headstud Install How-To
Top