Forums
New posts
Search forums
What's new
New posts
New media
New media comments
New profile posts
Latest activity
New showcase items
New showcase comments
Media
New media
New comments
Search media
Members
Current visitors
New profile posts
Search profile posts
Showcase
New items
New comments
Latest content
Latest reviews
Latest updates
Search showcase
Log in
Register
What's new
Search
Search
Search titles only
By:
New posts
Search forums
Menu
Log in
Register
Install the app
Install
Forums
Non - Specific
Suspension, Drive Train, and Tires
Home Made Traction Bar Build on a Budget
JavaScript is disabled. For a better experience, please enable JavaScript in your browser before proceeding.
You are using an out of date browser. It may not display this or other websites correctly.
You should upgrade or use an
alternative browser
.
Reply to thread
Message
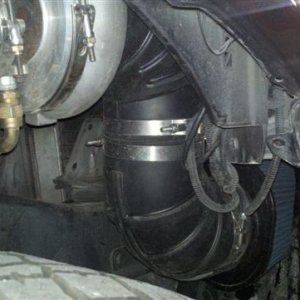
[QUOTE="HobbyStock62, post: 897892, member: 9597"] So, I got the idea from Ford Rules, basically building off of the hardware, rod ends, and mount styles that he used. I figured I would also do a thread and try to add as much pictures as you people want. All said and done, I have a little under $300 into this, that includes bolts, paint (we will see how the rattle can paint holds up, might end up powder coating them later on), all that stuff... Materials Used: 2" O.D 1.5" I.D DOM tubing, 72" long. I got that from industrialmetalsales.com for a little under $50 a stick (way cheaper than anywhere else I found, about half the price of discount steel). I got 72" because that was the longest length that they offered. With the rod ends, they will end up being 78" from bolt to bolt. These are going on a crew cab long box. Rod ends: (2) 7/8" rod ends, left hand thread Bushings: (2) Ballistic fab 2.63" bushings right hand threads, kinda huge, get the bushings before making your mounts...I made some mounts, got the bushings and then noticed that the bushing was just as big as the whole mount...so needless to say, I had to make new front mounts. Tube adapters: (2) 1.25" 12tpi right hand thread (2) 7/8" 14tpi left hand thread Steel: I used all 10ga steel (little over 1/8"), I think that it will be plenty strong, but I will let you guys know if I bend a mount sideways! Make sure that the steel you get is not warped! I had about 1 sqft of straight steel, and 150sqft of nice a warped steel...so it was difficult at times to make sure the mounts are square and as straight as possible. Hardware: I used all 3/4" hardware, it is probably overkill, but just to be safe. Starting the front mounts. These will bolt onto the frame. [IMG][URL=http://s1013.photobucket.com/user/jonheath12/media/B2962CCA-AEDD-4F35-9450-4D027B935DDE_zpst4hsctgd.jpg.html][IMG]http://i1013.photobucket.com/albums/af253/jonheath12/B2962CCA-AEDD-4F35-9450-4D027B935DDE_zpst4hsctgd.jpg[/IMG][/URL][/IMG] [IMG][URL=http://s1013.photobucket.com/user/jonheath12/media/00F62AF2-16C0-448A-80F0-CB61E4E3080E_zps6z5wmt8v.jpg.html][IMG]http://i1013.photobucket.com/albums/af253/jonheath12/00F62AF2-16C0-448A-80F0-CB61E4E3080E_zps6z5wmt8v.jpg[/IMG][/URL][/IMG] [IMG][URL=http://s1013.photobucket.com/user/jonheath12/media/708272BF-C89A-43E3-8BA7-BFFC96F5B34C_zpsxhodnnpv.jpg.html][IMG]http://i1013.photobucket.com/albums/af253/jonheath12/708272BF-C89A-43E3-8BA7-BFFC96F5B34C_zpsxhodnnpv.jpg[/IMG][/URL][/IMG] [IMG][URL=http://s1013.photobucket.com/user/jonheath12/media/10A49E7E-D240-4DB6-B7CC-103F48F718EA_zpsyv24kgr3.jpg.html][IMG]http://i1013.photobucket.com/albums/af253/jonheath12/10A49E7E-D240-4DB6-B7CC-103F48F718EA_zpsyv24kgr3.jpg[/IMG][/URL][/IMG] [IMG][URL=http://s1013.photobucket.com/user/jonheath12/media/B5BC1A0A-7F33-496D-BCC9-87F75F5EFB0C_zpsjcytrcon.jpg.html][IMG]http://i1013.photobucket.com/albums/af253/jonheath12/B5BC1A0A-7F33-496D-BCC9-87F75F5EFB0C_zpsjcytrcon.jpg[/IMG][/URL][/IMG] [IMG][URL=http://s1013.photobucket.com/user/jonheath12/media/3F3483F4-2994-4297-90C1-A2F950BD066D_zpsmcpt1zhh.jpg.html][IMG]http://i1013.photobucket.com/albums/af253/jonheath12/3F3483F4-2994-4297-90C1-A2F950BD066D_zpsmcpt1zhh.jpg[/IMG][/URL][/IMG] [IMG][URL=http://s1013.photobucket.com/user/jonheath12/media/3B1B76BD-C296-422A-B40B-983E6375EF54_zpsder31bsd.jpg.html][IMG]http://i1013.photobucket.com/albums/af253/jonheath12/3B1B76BD-C296-422A-B40B-983E6375EF54_zpsder31bsd.jpg[/IMG][/URL][/IMG] [IMG][URL=http://s1013.photobucket.com/user/jonheath12/media/C8A788F1-735B-4EB8-8ADF-09A88C060B75_zps737mivfs.jpg.html][IMG]http://i1013.photobucket.com/albums/af253/jonheath12/C8A788F1-735B-4EB8-8ADF-09A88C060B75_zps737mivfs.jpg[/IMG][/URL][/IMG] [IMG][URL=http://s1013.photobucket.com/user/jonheath12/media/839E65CB-314D-41F0-94B4-547365229374_zps70jhuzzj.jpg.html][IMG]http://i1013.photobucket.com/albums/af253/jonheath12/839E65CB-314D-41F0-94B4-547365229374_zps70jhuzzj.jpg[/IMG][/URL][/IMG] [IMG][URL=http://s1013.photobucket.com/user/jonheath12/media/A10E61BA-EB74-4DB4-906A-68FB6B1F6314_zpsfq26vlfr.jpg.html][IMG]http://i1013.photobucket.com/albums/af253/jonheath12/A10E61BA-EB74-4DB4-906A-68FB6B1F6314_zpsfq26vlfr.jpg[/IMG][/URL][/IMG] [IMG][URL=http://s1013.photobucket.com/user/jonheath12/media/D3D9B709-6EEC-411A-B8A6-D2600D0127CF_zpsnmtbro2h.jpg.html][IMG]http://i1013.photobucket.com/albums/af253/jonheath12/D3D9B709-6EEC-411A-B8A6-D2600D0127CF_zpsnmtbro2h.jpg[/IMG][/URL][/IMG] [IMG][URL=http://s1013.photobucket.com/user/jonheath12/media/0186F83F-4D1B-48D1-ADBC-1088CBB8A4E5_zps0uoxh5up.jpg.html][IMG]http://i1013.photobucket.com/albums/af253/jonheath12/0186F83F-4D1B-48D1-ADBC-1088CBB8A4E5_zps0uoxh5up.jpg[/IMG][/URL][/IMG] [IMG][URL=http://s1013.photobucket.com/user/jonheath12/media/F0FE5B78-56A7-4265-B2AA-3F10DAB9D1E8_zpsrg4apkqp.jpg.html][IMG]http://i1013.photobucket.com/albums/af253/jonheath12/F0FE5B78-56A7-4265-B2AA-3F10DAB9D1E8_zpsrg4apkqp.jpg[/IMG][/URL][/IMG] That pretty much sums up the front mounts, I do have more pictures if anyone wants to see. Front mounts: Soooo, my iphone pooped itself kinda, and lost a good amount of pictures that I had on the front mounts, but the process is basically the same, use a square to get the first angle correct, tack weld the other side on, and space it accordingly, then more welds, stick in vise, pound the snot out of it to curve the metal, and yada yada yada. This were a little bit of a PITA because of the warped metal I had. [IMG][URL=http://s1013.photobucket.com/user/jonheath12/media/B7E485C8-D73F-432B-AC08-C7723CF5DA47_zpsazsx1a2u.jpg.html][IMG]http://i1013.photobucket.com/albums/af253/jonheath12/B7E485C8-D73F-432B-AC08-C7723CF5DA47_zpsazsx1a2u.jpg[/IMG][/URL][/IMG] [IMG][URL=http://s1013.photobucket.com/user/jonheath12/media/D540B1D3-94B7-4FB9-98A9-A570F7424F63_zpsajxcl77k.jpg.html][IMG]http://i1013.photobucket.com/albums/af253/jonheath12/D540B1D3-94B7-4FB9-98A9-A570F7424F63_zpsajxcl77k.jpg[/IMG][/URL][/IMG] [IMG][URL=http://s1013.photobucket.com/user/jonheath12/media/E36EF26B-828F-412E-AA1A-28292B2823CC_zpssdwyhobd.jpg.html][IMG]http://i1013.photobucket.com/albums/af253/jonheath12/E36EF26B-828F-412E-AA1A-28292B2823CC_zpssdwyhobd.jpg[/IMG][/URL][/IMG] [IMG][URL=http://s1013.photobucket.com/user/jonheath12/media/E91E8F64-9607-479D-A72A-4A97AFAD3742_zpswaxfprmj.jpg.html][IMG]http://i1013.photobucket.com/albums/af253/jonheath12/E91E8F64-9607-479D-A72A-4A97AFAD3742_zpswaxfprmj.jpg[/IMG][/URL][/IMG] [IMG][URL=http://s1013.photobucket.com/user/jonheath12/media/42E15AA6-3EAE-4C55-9645-FFDF5DE47E41_zpsukoo4cqi.jpg.html][IMG]http://i1013.photobucket.com/albums/af253/jonheath12/42E15AA6-3EAE-4C55-9645-FFDF5DE47E41_zpsukoo4cqi.jpg[/IMG][/URL][/IMG] [IMG][URL=http://s1013.photobucket.com/user/jonheath12/media/D78F7C08-AEBA-4786-B08B-D8BDF088E7B1_zpsh8rl3771.jpg.html][IMG]http://i1013.photobucket.com/albums/af253/jonheath12/D78F7C08-AEBA-4786-B08B-D8BDF088E7B1_zpsh8rl3771.jpg[/IMG][/URL][/IMG] Unfortunately, these are all the pictures I have on the rear mounts, I am making another set of these in a couple weeks, I can get more pictures then. Here is a picture of the bars themselves and the bushings/rod ends. Just a single bar style, want them to be as light as possible. [IMG][URL=http://s1013.photobucket.com/user/jonheath12/media/66DF0F8C-D5CA-424A-A4B9-28AD0A2EBCE3_zps7zyqvho6.jpg.html][IMG]http://i1013.photobucket.com/albums/af253/jonheath12/66DF0F8C-D5CA-424A-A4B9-28AD0A2EBCE3_zps7zyqvho6.jpg[/IMG][/URL][/IMG] [IMG][URL=http://s1013.photobucket.com/user/jonheath12/media/A10A8613-D71D-4676-8E4D-32B8EFA9971E_zpstbrnnwts.jpg.html][IMG]http://i1013.photobucket.com/albums/af253/jonheath12/A10A8613-D71D-4676-8E4D-32B8EFA9971E_zpstbrnnwts.jpg[/IMG][/URL][/IMG] [IMG][URL=http://s1013.photobucket.com/user/jonheath12/media/04999A45-63AC-4B4C-91E0-88032E6F2053_zps5uow41ke.jpg.html][IMG]http://i1013.photobucket.com/albums/af253/jonheath12/04999A45-63AC-4B4C-91E0-88032E6F2053_zps5uow41ke.jpg[/IMG][/URL][/IMG] [IMG][URL=http://s1013.photobucket.com/user/jonheath12/media/9AAB8FC6-9CD7-45E4-9F84-289D0FF2E2FA_zpsbhrjvvt2.jpg.html][IMG]http://i1013.photobucket.com/albums/af253/jonheath12/9AAB8FC6-9CD7-45E4-9F84-289D0FF2E2FA_zpsbhrjvvt2.jpg[/IMG][/URL][/IMG] That is what I have so far, I will be painting everything tomorrow and will add more pictures. Can hopefully get them on my truck in a week or two. 0 degrees is about the high temp for the next two weeks...want to be outside for as little as possible. [/QUOTE]
Insert quotes…
Verification
Post reply
Random media
Latest posts
T
B&W hitch and shock removal
Latest: TexMac
Yesterday at 2:48 PM
2017+ 6.7 Aluminum Super Duty
6
ISSUES WITH CHOATES WARRANTY
Latest: 6.7powersmoke
Yesterday at 2:12 PM
1999-2015 Superduty Series General
Truck slipping into 4th
Latest: Sterling6.7
Friday at 7:18 PM
6.7 Tech
Do not recommend Choate Engineering
Latest: DEEZUZ
Apr 23, 2025
Newly Enlisted
A few turbo questions and a rant
Latest: ghohouston
Apr 23, 2025
7.3 Aftermarket
Members online
GRN250
Forums
Non - Specific
Suspension, Drive Train, and Tires
Home Made Traction Bar Build on a Budget
Top