7.3 OBS Build: Gloria

mandkole

Active member
Joined
Jan 14, 2012
Messages
2,303
Reaction score
2
Location
Northwest
Hmm, I wonder if I should look into wiring up the manual TC lock switch for this type of thing…

In my case, the tuning locks the TC immediately in low gears with over 65-70% throttle. Would assume that the E4 could be tuned the same way?

Would agree that going to the larger injectors really changes the performance but its about tradeoffs and what you want. There's days I think about taming down the turbo/injector package to focus more on towing and getting rid of the 42R noise in the cab.

You've really done good on the truck--enjoy it.
 

m j

Active member
Joined
Jan 13, 2013
Messages
1,225
Reaction score
0
Location
BC Canada Eh!
at about 35psi (256hz) the MAP sensor output exceeds the range the PCM can read and it rolls back to a zero reading, which is about -30psi.
I tested this with a couple of regulators and a shop air source monitoring with TorquePro.
after you wrap the MAP it takes a couple of seconds for the PCM to come back to normal.

I THINK it has to do with the MAP exceeding 255hz which is FF in hexadecimal and the biggest number that can be put in the 2 locations allotted the PID. but I know nothing about computer stuff.
 

Krause

New member
Joined
May 18, 2011
Messages
304
Reaction score
0
Location
BC Canada, and PA USA
Well I'll go ahead a resurrect this thread guys, I've gotten myself into a new project...

To make a long story short, I've never been super happy with how this truck rides.. Take that and combine it with I was getting a little anxious to get back in the shop, and I decided to make some changes. Im likely chasing a unicorn with the whole ride quality deal, but all good with me I just like to build stuff.

A little history, this truck currently already has 04 SD axles front and rear. A got a deal on them and installed cause I wanted 4 wheel disk brakes.. Again, was never super happy with how it rode with RSK.

So I found an purchased an 06' front SD axle, essentially the whole front half of the frame. Im happy with the rear and to save some money, I opted to leave the current 04 axle in the rear (I'll add spacers if it looks Really funny).

Got it home and tore it down..
IMG_2008_zps8us6papa.jpg


Had a dirty a** day wire wheeling and cleaning. Got it ready and sprayed with a metal/surface prep.

DSC_0311_zpsbsvqsnal.jpg


DSC_0312_zps51ckyocf.jpg


knuckles also got cleaned up, they were in rough shape particularly on the inside.
DSC_0313_zpsqqrvqi1o.jpg


Then got a coat of this aluminum epoxy primer stuff Ive been using for a few projects now.

DSC_0315_zpsm4m8rqko.jpg


DSC_0316_zpsjjeziest.jpg


Knuckles got the same treatment.

DSC_0317_zpsdkzhi65p.jpg


Then it was epoxy paint time. I did my rad core support with the same stuff, and it is nasty nasty stuff. Im fairly happy with it. Its not professional quality finish or anything cause im just putting it on with foam brushes. So its not a show truck or anything, but it cleans it up a lot.

DSC_0318_zpscnt9sht4.jpg


DSC_0319_zpsb1fm1rjh.jpg


The knuckles were done in black for protection, then overcoated with a cast iron colour I have taken a liking to. Makes for a nice colour scheme no one will ever see :shrug:

DSC_0320_zpssohuzauu.jpg


And got everything put back together.

DSC_0322_zpstmvsx5wp.jpg


DSC_0321_zpsk6xzomfk.jpg


-Andrew
 

Krause

New member
Joined
May 18, 2011
Messages
304
Reaction score
0
Location
BC Canada, and PA USA
So continuing on with this 05+ install theme, Im not a big fan of the stock radius arms, and as I mentioned before I just like to build stuff. I figured I would do some pondering and see what I could come up with in terms of reasonably within reach for fabrication at home with just my trusty grinder.

I wanted to build a 3-link setup that is adjustable for the radius arms. Trevor at PMF sells a dynamite set of these, and OUO makes a nice set as well. But 1000$ wasnt realistic, so this is really just me attempting to emulate off internet pictures a fuctional set of 3 link radius arms.

I started finding some DOM. I have no idea what PMF uses, so I had to kinda exercise caution with this, I ended up going with 2.25 3/8s wall DOM. And this stuff is MASSIVE!

IMG_2090_zpscxrasl3u.jpg


For the 'C' clips that must attach to the back of the axle, I bought 6x4 1/4inch wall rectangular tube from a structural steel shop. I used grinder to cut 4 inch pieces off, and then cut open one of the 4 inch faces.

DSC_0324_zpsgbilo3bn.jpg


DSC_0325_zpsofq89ln7.jpg


This is the stock radius arm and kinda where I started with the C clips.

IMG_2076_zpsvjegdb9a.jpg


Then I radius-ed the front so the look nice.

IMG_2078_zpskn8j47li.jpg


Next, I got lucky and found some 2.5x3.5 1/4 rectangular tube at my local steel shop. This has a 2 inch inner diameter, which is what I wanted. Picked some of that up.

DSC_0327_zpswlewlct5.jpg


Cut a piece off (10 inches) and ripped it in half to get two triangles.

DSC_0328_zpsvaedhp2a.jpg


So this is the general idea of where I am going at this point..

DSC_0329_zpsrbujovok.jpg


(BTW, joints and Ballistic joints from Ballistic fab, the 3 and 2 inch versions. Took a little while to ship but the are pretty sweet).

DSC_0330_zpsgbtguuoa.jpg

DSC_0331_zpsdsx2shjl.jpg


Then I radius-ed in the back of the saddle bracket so that it would sit well on the main top piece.

DSC_0332_zpsyg9kro9t.jpg


DSC_0333_zps9cxui2zl.jpg


And after a bit more measuring and opening up the bottom of the bracket to properly clear the zerk and lower ballistic joint, I was able to cut the main upper DOM piece, and here is where it is at now.

DSC_0334_zpsaaaxliv7.jpg


The shorter lower piece of tube is doing to be 2" DOM 1/4 wall, not quite the big stuff the upper is, but shouold still be plenty of meat on the bone.

Going to be making some gussets for the C clips where they attack to tube and a few other things, but you can see where it is coming together at this point, IM happy with how they are looking.

-Andrew
 

TyCorr

New member
Joined
Jun 23, 2011
Messages
15,461
Reaction score
0
Yea. Its pretty nice clean execution on everything. I like the little touches like the cast iron paint.
 

Krause

New member
Joined
May 18, 2011
Messages
304
Reaction score
0
Location
BC Canada, and PA USA
Well made some progress on these radius arms. They are finished save for some polishing in a few areas, then the same paint treatment the axle got.

I think where it left off was the top tube mocked in.

So here is the jigging up continuing.

DSC_0335_zpsfsauvhhy.jpg


DSC_0336_zpspdvrrfts.jpg


And here they are finished. Took about 4.5 hours of tig torch time to get them welded and burned in. Obviously the upper 3/8's upper tube takes a ton of heat and had a big synchrowave wound up pretty bad. We were dimming the lights in the neighborhood.

DSC_0337_zpsgcsx9mre.jpg


DSC_0338_zpshbu60h0w.jpg


DSC_0339_zpswagidtkr.jpg


DSC_0340_zpshnejwnhp.jpg


And here is a WD40 can to give you a reference to just how big these things are...

DSC_0341_zpsrqqqravw.jpg


Next step is paint. Then I'll have to tackle the swap soon.

-Andrew
 

TyCorr

New member
Joined
Jun 23, 2011
Messages
15,461
Reaction score
0
This makes me miss my shop. Not that I fabbed ala's but just keeping the truck maintained and clean...
 

Krause

New member
Joined
May 18, 2011
Messages
304
Reaction score
0
Location
BC Canada, and PA USA
Well, here is an update as the deed is done.

I guess to begin, here and the 3-link arms I made all painted and done.

DSC_0039_zpsvfubwjum.jpg


Got the truck in a good friend's shop, and blasted the previous axle (an 04 SD axle) out.

DSC_0037_zpsfrmslwja.jpg


DSC_0035_zpsnoaxswp0.jpg


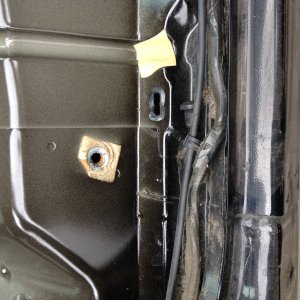
Here is the hanger you must remove still installed.

DSC_0036_zpsyfqfx61j.jpg


And here it is removed (on the other side)

DSC_0041_zpsblvfczvb.jpg


A couple other odds and ends rivets need to be removed, and the original shock towers taken out

DSC_0043_zpsm45vf8jy.jpg


Then the rear mounting bracket gets located and you start drilling. There are three bolts in the cpture under the frame, and 4 in the face, for 7 per side. I strongly recommend a quality stepper bit for this, with a 1/2 largest size step so you can just keep ramming them home.

DSC_0046_zpsomjg8sqd.jpg


DSC_0042_zpsak2tn6ap.jpg


3 Link bars get put in place

DSC_0048_zpsg42aonlq.jpg


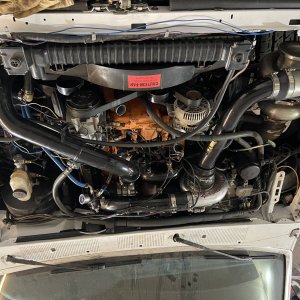
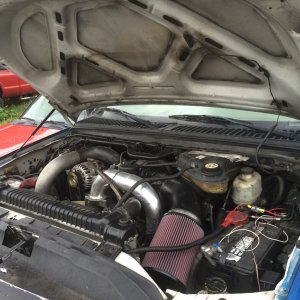
Then the axle gets put into place after all the prep.

DSC_0038_zpsrfprd4bq.jpg


DSC_0049_zps3jlhyebe.jpg


DSC_0050_zpsnd8kvggx.jpg


DSC_0053_zpseuggj5s6.jpg


Then locate the coil buckets and drill them in. Some people have removed he capture on the bottom of the coil bucket, I do not recommend this at all, and they fit pretty nicely with it on anyways. I dont have any pics of this process, but once you have them put in, you can put the coil springs in. I had to jimmy-rig a shock setup because mine turned out to be too long, some replacment bilsteins are on the way.

DSC_0054_zpsqdunjvic.jpg


Gets your brakes done up and hooked up. I reused my existing extended lines, but they need to be replaced with proper 05 ones. The fitting at the caliper is kinda wonky and the only reason I could reuse mine was my rims are so offset they allowed for it.

This is important, do NOT try to load the suspension or test ride height, anything until the track bar is installed. The coils are like wet noodles, and if you have your steering hooked up, it will be the only thing holding the axle under the truck. The truck will fall off one side or the other without the track bar installed.

For my track bar, I used some leftover 2" DOM from the 3 link bars, and sleeved the stock track bar (1.5 " ID, which is the OD of the stock track bar). then I had a weld in insert, along with a new gigantic 1.25 heim joint, which was then welded on the other end of the sleeve, and I reused my existed bracket on the frame that we had installed for the previous SD axle.

DSC_0055_zpsjedgzm6t.jpg


Get the steering hooked up and fill axle with oil

DSC_0057_zpswgga21qq.jpg


DSC_0058_zpsybo4i5s5.jpg


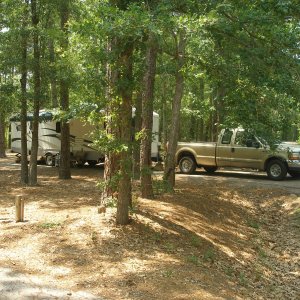
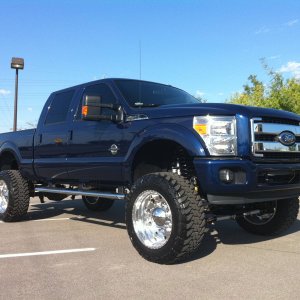
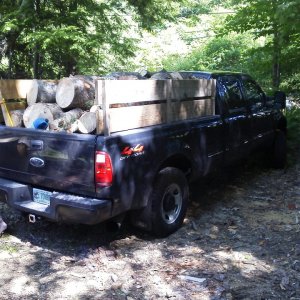
Wheels went back on,

DSC_0060_zpsqg2mjgua.jpg


I am looking for 05+ SD 18" wheels. Mine are heavily offset, and do better of 04 and older trucks. The wider 05 axle has stanced them out a bit too far for my liking, so will have to change rims eventually again. Anyways..

This is how the 3 links sit under load, pretty much dead on horizontal..

DSC_0061_zpsixhomt2u.jpg


And thats all the pictures I have. I reamed my pitman arm out for the larger 06 tierod connection. I wanted an 05+ box but didnt happen on one soon enough. Eventually I will change it. There is a small clunk that I suspect is the shocks because they have a bolt much to small for the lower hole, so I am not even bothering to chase it down until new shocks show up.

Other than that, it rides much much better. I am not sure if my RSK was not set up perfectly or what, but driving home was noticeably smoother. The coils are much softer than the leaf springs ever were.

For a purely subjective example, the 78 going through PA from NJ, has some stretches where the right lane is so bad from trucks and abuse that I would have to change into the left just to make it bearable before. The repeated bumps and oscillations would just keep rattling the truck to the point it was almost undrivable unless you changed lanes. This scenario 100% changed with the new setup. The coils are noticeably softer and were able to soak up the continued bumps and expansion joints without gradually getting worse and worse. Very happy with how it performed, and how it looks.

*I did put upper 2.5 inch coil spacers in which I dont thing is clearly depicted. I was not willing to guess on 350$ coils and not nail the ride height I wanted, so I purchased TGC coil spacers off amazon to get me in the ballpark based on previous conversion threads, and then I can order lift coils of the exact height I want later.

I think that is all for now.

-Andrew
 

Latest posts

Members online

Top