Lt.Dan
Member
Hey guys, i made this write up about a year ago, along with an E-fuel write up shortly after over on PSN. I figured i would share them over here as well. Enjoy guys.
Hey guys, I've been doing a lot of research on doing Efuel etc, and learning how the entire fuel system works, so i decided to do my Efuel setup in 2 steps.
The first step is this one im writing about here.
Parts List:
Fuel Bowl (Optional, you can use parts off the existing bowl in your truck)
8 ft of 3/8" Fuel Injection Hose, SAE rating R30J9 ~$40 (Diesel Approved, you can get it at any Napa/Oreilly's/AutoZone)
1/2-in x 1/4-in Brass Pipe Fitting Purchased from my Local Lowes for $4.59 each, 2 required.
Watts 3/8-in x 1/4-in Threaded Cap Fitting Purchased from my Local Lowes for $2.79 each, 3 required.
Napa Filter Base Part #: 4770 Purchased from my Local Napa for $44.99. Can be found cheaper online.
Napa Gold Fuel Filter Part #: 3405 Purchased at my Local Napa for $22.32. Can be found cheaper online.
Yellow PTFE Tape Purchased at my local ACE Hardware for $4.
Total Cost:
$126.06 (Not including Tax)
I gathered all the parts, from several different places, from different cities, and installed it all within a 6 hour period, with periodic breaks in between, it does not take long, and can all be had at local stores usually open on weekends.
I based this off of the "Tightwad Fuel Bowl ******", but made it a little more simple.
So, I started out with getting a spare Fuel Bowl from a friend, as I was preparing for experimentation, and didnt want to experiment on my only one that needed to keep the truck running. And i pulled off the entire FPR housing off the side, pulled off the little black housing off the bottom (I understand there were 2 types, one with a black plastic housing, and one with a pipe held in with a snap ring, I fortunately had both of them and they are essentially the same inside.
I then sent a NPT Tap the same size as my 3/8" hose barb, through the center hole, as seen in pic below, then using the thread sealant, i tightened it down inside.
*** This is where its different from joedaddy's how-to, i do not cut/grind/modify the fuel pressure regulator in any way, it does not need to be, and at a later date can be returned to stock if you wanted to, without needing to buy any necessary parts.***


Now that thats ready, we can start moving to our fuel filter assembly, Im sorry i didnt get very many pictures of it, but pretty straight forward, with the fittings that you have left, you can thread the 1/2" to 3/8" adapter into the 3/8" hose barb (with thread sealant), and thread both of them into the filter mounting base. I chose to point them in the same direction, on this base you can choose from many different options, just be sure you also install the 2 plugs that were supplied with the base in any holes that are not being used, and everything is thread sealed. Then you can mount it in your choice of position, i chose the same place that joedaddy did, and mounted it off the radiator bolts off the side, next to the driver side battery, with a few holes drilled in some 2" Flat stock, we were in business. *Note* In this spot, i had to bend the A/C lines to clear the massive filter, just be careful not to pinch/break the lines or the will have to be replaced***
There is also a direction that the fuel needs to go through the filter, on top of the mounting base, there are arrows for "In" and "Out". Obviously the arrow pointed towards the center is the flow of fuel coming in, (Unfiltered) and the arrow pointing out is the flow of fuel going out, (filtered). Or you can also tell when looking at a fuel filter fuel going inside the outer "ring" and out the big threaded hole in the center.

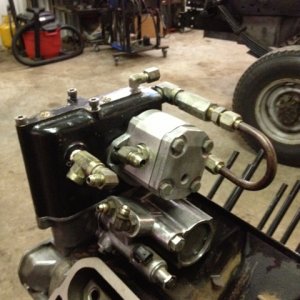
Then were off to the center of the motor, go ahead and pull the intake spider off, and stuff the holes with rags, to keep and debris/tools from going into the intake, then remove the fuel bowl (several hoses and one electrical plug, there are several videos/how to's on the internet about this), and you should have something that looks like this:

Then, you can route your hoses from the pump to the filter, which, if you are unfamiliar, the top right piece of your pump is your "feed" or "inlet" from the fuel tank, which then gets sent out the top left portion, to the filter, then returns through the bottom end at higher pressure to the back of the heads.
So with that being said, you can take some of that 3/8" Fuel injection lines and hook up the top left fitting from the pump, to the inlet on the filter mounting base, and the bottom fitting from the pump, to the outlet on the filter mounting base. And it should look like this:

Once that is done, you can install your "fuel pressure regulator", except only 3 hoses will go into the regulator, the 2 return lines that hook up to the 37* inverted flare fittings, and the one fuel return line back into the tank (hard metal line pointing straight up from the valley).
NOTE:
Now, i had no idea the return line back to the tank was 5/16", and i put a 3/8" hose barb inside the FPR, so i just took a piece of 3/8" Fuel Injection line and put it over both, and squeezed down the 3/8" hose over the 5/16" metal line, now for now it does not leak, but i will search an alternate solution for this, maybe an adapter like i did at the filter mounting base, but for now, it holds, and doesn't leak.
It should look something like this:

Now that the entire system is put together, you must hook up one plug in order for the truck to start up, and it plugs into the HPOP, the IPR sensor, the rest are not necessary, as they are "Water in Fuel" sensor and the other is for the fuel heater. So i pulled the harness out of the fuel bowl (Very carefully), then just wrapped it up in electrical tape to be smaller and easier to handle, and plugged in both ends.
I know its not pretty, but it works:

Now also be sure to prime the fuel filter before you fire up the truck, the filter is very large, and will take a considerable time to fill up, now depending on how long this job took you (for me was a couple hours) there might still be fuel in the heads, so the truck will start fine, but will starve itself in a matter of a minute or so if the filter is not primed, then is one sonofagun to get to fire back up, so word of advice, prime the filter before installation.
For questions/comments/concerns, or ways to improve this, feel free to ask, id be happy to help, and open to suggestions.
Thanks guys!
Hey guys, I've been doing a lot of research on doing Efuel etc, and learning how the entire fuel system works, so i decided to do my Efuel setup in 2 steps.
The first step is this one im writing about here.
Parts List:
Fuel Bowl (Optional, you can use parts off the existing bowl in your truck)
8 ft of 3/8" Fuel Injection Hose, SAE rating R30J9 ~$40 (Diesel Approved, you can get it at any Napa/Oreilly's/AutoZone)
1/2-in x 1/4-in Brass Pipe Fitting Purchased from my Local Lowes for $4.59 each, 2 required.
Watts 3/8-in x 1/4-in Threaded Cap Fitting Purchased from my Local Lowes for $2.79 each, 3 required.
Napa Filter Base Part #: 4770 Purchased from my Local Napa for $44.99. Can be found cheaper online.
Napa Gold Fuel Filter Part #: 3405 Purchased at my Local Napa for $22.32. Can be found cheaper online.
Yellow PTFE Tape Purchased at my local ACE Hardware for $4.
Total Cost:
$126.06 (Not including Tax)
I gathered all the parts, from several different places, from different cities, and installed it all within a 6 hour period, with periodic breaks in between, it does not take long, and can all be had at local stores usually open on weekends.
I based this off of the "Tightwad Fuel Bowl ******", but made it a little more simple.
So, I started out with getting a spare Fuel Bowl from a friend, as I was preparing for experimentation, and didnt want to experiment on my only one that needed to keep the truck running. And i pulled off the entire FPR housing off the side, pulled off the little black housing off the bottom (I understand there were 2 types, one with a black plastic housing, and one with a pipe held in with a snap ring, I fortunately had both of them and they are essentially the same inside.
I then sent a NPT Tap the same size as my 3/8" hose barb, through the center hole, as seen in pic below, then using the thread sealant, i tightened it down inside.
*** This is where its different from joedaddy's how-to, i do not cut/grind/modify the fuel pressure regulator in any way, it does not need to be, and at a later date can be returned to stock if you wanted to, without needing to buy any necessary parts.***
Now that thats ready, we can start moving to our fuel filter assembly, Im sorry i didnt get very many pictures of it, but pretty straight forward, with the fittings that you have left, you can thread the 1/2" to 3/8" adapter into the 3/8" hose barb (with thread sealant), and thread both of them into the filter mounting base. I chose to point them in the same direction, on this base you can choose from many different options, just be sure you also install the 2 plugs that were supplied with the base in any holes that are not being used, and everything is thread sealed. Then you can mount it in your choice of position, i chose the same place that joedaddy did, and mounted it off the radiator bolts off the side, next to the driver side battery, with a few holes drilled in some 2" Flat stock, we were in business. *Note* In this spot, i had to bend the A/C lines to clear the massive filter, just be careful not to pinch/break the lines or the will have to be replaced***
There is also a direction that the fuel needs to go through the filter, on top of the mounting base, there are arrows for "In" and "Out". Obviously the arrow pointed towards the center is the flow of fuel coming in, (Unfiltered) and the arrow pointing out is the flow of fuel going out, (filtered). Or you can also tell when looking at a fuel filter fuel going inside the outer "ring" and out the big threaded hole in the center.
Then were off to the center of the motor, go ahead and pull the intake spider off, and stuff the holes with rags, to keep and debris/tools from going into the intake, then remove the fuel bowl (several hoses and one electrical plug, there are several videos/how to's on the internet about this), and you should have something that looks like this:
Then, you can route your hoses from the pump to the filter, which, if you are unfamiliar, the top right piece of your pump is your "feed" or "inlet" from the fuel tank, which then gets sent out the top left portion, to the filter, then returns through the bottom end at higher pressure to the back of the heads.
So with that being said, you can take some of that 3/8" Fuel injection lines and hook up the top left fitting from the pump, to the inlet on the filter mounting base, and the bottom fitting from the pump, to the outlet on the filter mounting base. And it should look like this:
Once that is done, you can install your "fuel pressure regulator", except only 3 hoses will go into the regulator, the 2 return lines that hook up to the 37* inverted flare fittings, and the one fuel return line back into the tank (hard metal line pointing straight up from the valley).
NOTE:
Now, i had no idea the return line back to the tank was 5/16", and i put a 3/8" hose barb inside the FPR, so i just took a piece of 3/8" Fuel Injection line and put it over both, and squeezed down the 3/8" hose over the 5/16" metal line, now for now it does not leak, but i will search an alternate solution for this, maybe an adapter like i did at the filter mounting base, but for now, it holds, and doesn't leak.
It should look something like this:
Now that the entire system is put together, you must hook up one plug in order for the truck to start up, and it plugs into the HPOP, the IPR sensor, the rest are not necessary, as they are "Water in Fuel" sensor and the other is for the fuel heater. So i pulled the harness out of the fuel bowl (Very carefully), then just wrapped it up in electrical tape to be smaller and easier to handle, and plugged in both ends.
I know its not pretty, but it works:
Now also be sure to prime the fuel filter before you fire up the truck, the filter is very large, and will take a considerable time to fill up, now depending on how long this job took you (for me was a couple hours) there might still be fuel in the heads, so the truck will start fine, but will starve itself in a matter of a minute or so if the filter is not primed, then is one sonofagun to get to fire back up, so word of advice, prime the filter before installation.
For questions/comments/concerns, or ways to improve this, feel free to ask, id be happy to help, and open to suggestions.
Thanks guys!