Major overhaul - new front and rear suspension and some other goodies

TexasA&M

New member
Joined
Jul 10, 2012
Messages
92
Reaction score
0
Location
Ft. Worth, Texas
Well, I have been saving my money for a while and finally pulled the trigger on some different parts a couple of months ago. After getting everything together, the work started last weekend. The list of things that are going on the truck is as follows -

Firestone R4 Tech rear suspension
Icon 2.5" coil springs and Bilstein 5100s for the front suspension
BD Adjustable Track Bar
Viair on board air system (I have heard that the Firestone system that comes with the R4 kit is junk)
MBRP 4" Exhaust
B&W Turnover Ball hitch
NFab nerf bars
TGC dual steering stabilizers
Second set of air horns
Line X bedliner

So far, I've got the front/rear suspension done, along with the exhaust, on board air, and nerf bars installed. I'm hoping to wrap up the rest of it this coming weekend.

I had to pull the bed off to remove the old gooseneck hitch, which kind of spurred all of this into motion... I figured that it would be easier to do the bulk of this work without the bed, and I got a little trigger happy and ordered it all at once. Getting the bed off was pretty easy, except for one stubborn bolt that had to be cut. While the bed is off, I plan on doing the harpoon mod to the fuel tank.

Anyhow, on to the pictures -

Bed removed (you can see the stock exhaust, old hitch, and my old helper air bags) -

IMG_0678_zps6ee60397.jpg


IMG_0679_zps7bc73732.jpg


IMG_0680_zpsc3460887.jpg


I missed a few pictures, but I pressure washed the frame and sprayed it with rubberized undercoating. I removed all of the old accessories as well. Here, you can see the stock springs gone, and the R4 springs and brackets in place.

IMG_4135_zps1299d1c2.jpg


IMG_4141_zpsfe63975a.jpg


The brackets are well designed and fit really well. The instructions on how to install them, however, left a LOT to be desired.

IMG_4138_zpsac595a05.jpg


Springs bolted down, J Spring in place, air bags and height control valve installed -

IMG_4143_zps18cbb51f.jpg


IMG_4144_zpsc4d6a370.jpg


Passenger side airbag and shock -

IMG_4145_zpsc8f505c8.jpg


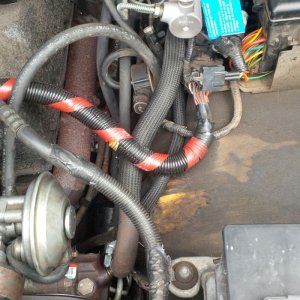
Air lines run and hooked up -

IMG_4146_zps3394a848.jpg


IMG_4148_zps301eba40.jpg


IMG_4150_zps7ea031c3.jpg


Viair compressor -

IMG_4149_zpsbe419199.jpg


System complete!

IMG_4147_zps1a2888d9.jpg


I don't have a picture yet, but I have a gauge in the cab that shows tank pressure, and the pressure in the driver's side air bag (I figured that both bags would have roughly the same pressure, so no reason to see both). I mainly want to see how the pressure changes with different loads, which is why I put a gauge on the bag.

On to the front -

Icon springs and shocks installed -

IMG_4151_zps1149450d.jpg


IMG_4152_zpsf71c9926.jpg


IMG_4156_zps65d60611.jpg


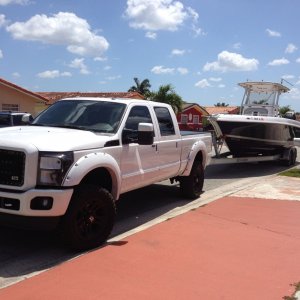
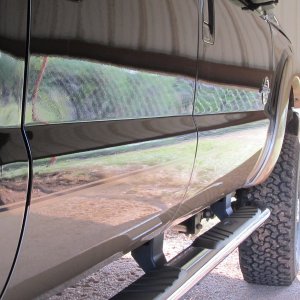
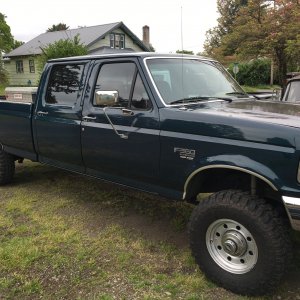
Overall pictures (you can see the MBRP exhaust and nerf bars) -

IMG_4155_zpsa0a2e4f9.jpg


IMG_4154_zps674263e9.jpg


IMG_4153_zps514416a0.jpg


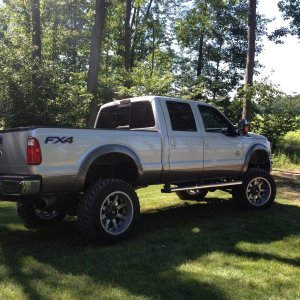
I can't wait to get the bed back on and see how it all looks. The rear is sitting 2" higher than it was stock (sits as high as a stock F350 now) and the front is 2.5" higher.

I still have quite a bit to do... there is a small leak on the tank side that I have to track down and I am going to clean up all of the wiring that I have installed (wrapping it in wire loom). The hitch has to be installed, but I can't tighten that all down yet because I have to line it up with the hole in the bed. Harpoon mod still has to be done, as well as the alignment cams and adjustable track bar. Hopefully I can knock that all out this weekend. I haven't even taken it for a test drive yet because I ran out of time, and it's been raining the last two days.

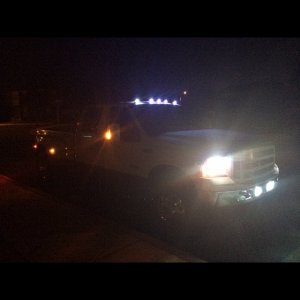
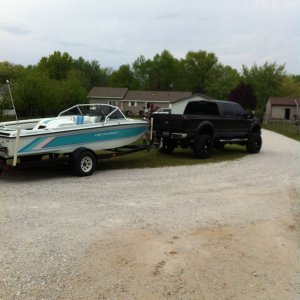
I'll take some more pictures and post up when I make more progress. Tires will be coming in the next couple of months to complete the package! :clapping:
 

TexasA&M

New member
Joined
Jul 10, 2012
Messages
92
Reaction score
0
Location
Ft. Worth, Texas
Saturday update...

I finished cleaning up some of the wiring yesterday and also installed the on board air quick connect. Which is mounted right behind the bumper. I need to find some kind of cover for it to keep it as clean as possible.

IMG_0749_zpse802510d.jpg


IMG_0765_zpsa4176ca2.jpg


Here is the gauge that I have in the cab to keep an eye on things -

IMG_0746_zpsb1d37380.jpg


The black needle is tank pressure, and the orange is the driver's side bag, which should be pretty close to the same as the passenger side bag.

Next, I did the harpoon mod. It was pretty easy with the bed off; I actually bought the Ford tool to remove the large nut on the tank off eBay for $12. Worth every penny. I went and filled up after that to make sure that there were no leaks. Filled it up almost to the top (pump stopped at $99), but it was full enough to slosh around and check for leaks and none were found.

Then I got to work installing the B&W. I just installed everything hand tight because I needed it to be able to move slightly to line up with the hole that I cut in the bed.

IMG_0744_zps4792cbb8.jpg


IMG_0745_zpsa625d270.jpg


IMG_0763_zpsc80ab635.jpg


After tidying up a bit more, and cutting the hole in the bed, it was time to put the bed back on.

IMG_0774_zps14684d95.jpg


IMG_0777_zps0ebbf826.jpg


I got the bed tightened down and the lights hooked back up, and then it got dark (and cold!!). I'm hoping tomorrow to get the hitch torqued down and then the rear suspension dialed in (it needs to be lowered a bit). Then I can finally do some road testing and see how it rides. If all goes well, I'll have enough time to install the track bar and alignment cams back in as well, and then I'll be all done!
 

TexasA&M

New member
Joined
Jul 10, 2012
Messages
92
Reaction score
0
Location
Ft. Worth, Texas
Got the hitch torqued down, and all of the rear end buttoned up. I lowered the suspension a bit and have it where I want (I think). I ran some errands in it on Sunday and it drove really well. You can still tell that it's a big truck, but a lot of the harshness is gone. You really feel the bumps in the front end more now than before. I'm really looking forward to putting a load on it and seeing how she handles.

I didn't get around to installing the track bar or alignment cams; I realized that I don't have tools near big enough for the track bar. I may have to farm that out and just have it done.

Here are a couple of pictures of how she sits now -

IMG_0783_zps73fc5a42.jpg


IMG_0784_zps9303d6fd.jpg


Hopefully the new tires will be coming in the next two months or so. I'll update this post after a couple of highway trips and let you guys know how I like the system.


Would you sell your old air bag setup?

I had them in the classifieds and sold them to another member last week.
 

07_powerstroke

New member
Joined
May 22, 2011
Messages
1,249
Reaction score
0
Location
Upstate, NY
Ok I plan to remove the bottom thick over load and run the lowest psi I can to raise the truck up 7/8 of a inch to Bing it back up to stock highth
 

TexasA&M

New member
Joined
Jul 10, 2012
Messages
92
Reaction score
0
Location
Ft. Worth, Texas
Thanks. I'm really itching for bigger tires now, and to hook up to a trailer. I may hook up to my camper the next time I have a free weekend and just drag it around for a while to see how it does.
 

TexasA&M

New member
Joined
Jul 10, 2012
Messages
92
Reaction score
0
Location
Ft. Worth, Texas
Well, I finally got around to working on the front end of my truck. Installing the adjustable track bar wasn't too terribly difficult. It was actually harder to put the new track bar together (the bushing is a bear to get in!) than it was to put it on the truck. I used a two jaw puller to get the old track bar off, and then just installed the new one. A big 3/4 drive ratchet, a piece of pipe, and some muscle got it all back together.

The alignment cams, however, are a different story. I couldn't get the passenger side one to budge at all, and ended up breaking off part of the ear. I stopped at that point so that I didn't do any more damage. Hopefully the alignment shop can get it out and put the new ones in without too much issue.

I had to pull the bed back off this weekend because my fuel tank was leaking a bit due to a poor seal when I did the harpoon mod. A new seal fixed it up. I decided to add some accumulator tanks (or ping tanks, depending on who you're talking to) while I was in there and it made a noticeable difference on the ride. I put 1/2 gallon tanks in because I wasn't sure that anything bigger would fit. Seeing how much difference they made though has me itching to install bigger tanks. I'll post up some pictures tomorrow.
 

TexasA&M

New member
Joined
Jul 10, 2012
Messages
92
Reaction score
0
Location
Ft. Worth, Texas
Update -

I had to pull the bed off again this weekend because my fuel tank was leaking a bit from an improper seal when I did the harpoon mod last month. While the bed was off, I figured it would be a good time to keep tinkering with the suspension, so I added in some accumulator tanks to help soften the spring rate on the air bags. I used 1/2ga tanks because I wasn't sure if anything bigger would fit. Now I wish I'd have gone with 1ga, and may switch them out in the future. I mounted them up to a cross member and then ran 1/2" line between them and the bags (distance was ~12").

IMG_0947_zps2aeee4be.jpg


IMG_0946_zps0e5cca9a.jpg


This pretty much finalizes the rear suspension. After putting the truck all back together and going for a test drive, I am very pleased with the results. I hooked my travel trailer up to it to see how it would handle the weight (~1300lbs tongue weight) and the system leveled itself right out after hooking up. I didn't tow it anywhere, but will hopefully do that in the next couple of weeks.

Next I moved on to the front end. I removed the old track bar and put a new adjustable BD track bar in its place.

IMG_0950_zpsbc5ac100.jpg


I was not able to get the original alignment cams out. I was working at the passenger side one for a while and ended up breaking part of the ear off and decided to quit while there was still some hope of salvaging it. I will be getting an alignment before I get my new tires, so hopefully the alignment shop can get the old cam out without too much trouble.

To finish it all up, I installed a second set of air horns, along with a second 3ga tank (for a total of 6ga air capacity).

Driver side -

IMG_0954_zps84a6097d.jpg


Passenger side -

IMG_0952_zpscf76b777.jpg


Other than a few small odds and ends, this pretty much wraps up the project. Overall, I'm pleased with the suspension and the fit and finish of all the parts that I used. Most of the work went smoothly without too many bumps in the road, which is always nice. Hopefully I can get the bed cleaned up in the next few weeks and get the new LineX bedliner put in. The tires will come next and will completely finish this up!
 

Mdub707

Active member
Joined
May 18, 2011
Messages
5,079
Reaction score
0
Location
Mohawk NY
Where did you end up getting the alignment cams from? I'm going to need to do the front end stuff myself in the spring. I just have the cheesy 2.5" aluminum spacers under my stock springs, and really want to go with a setup similar to yours, or go with the PMF 3 link in the front if money permits. Looks good man!
 

TexasA&M

New member
Joined
Jul 10, 2012
Messages
92
Reaction score
0
Location
Ft. Worth, Texas
Thanks for the compliments. As far as the alignment cams go, the ones I have came with the Icon springs. I believe you can order them independently from a few places though; Top Gun Customz maybe?

Anyone have any thoughts on removing those cams? I will probably end up just having the alignment shop to it, but I'd still rather knock it out myself if possible.
 

TexasA&M

New member
Joined
Jul 10, 2012
Messages
92
Reaction score
0
Location
Ft. Worth, Texas
Getting close to finishing up... I finally got around to having the LineX put in. I am very pleased with how it turned out. Now there are a few odds and ends, and then it is time for tires. The current tires still have a decent amount of tread on them, so I'm going to try and wait, but I'm not sure how long I'll be able to.

Anyhow, on to the pics!

IMG_1890_zps19c741c2.jpg


IMG_1891_zps7d7c26d0.jpg


IMG_1892_zps2f61b62a.jpg


IMG_1893_zpsa855a19f.jpg


IMG_1894_zpsd20964fb.jpg
 

TexasA&M

New member
Joined
Jul 10, 2012
Messages
92
Reaction score
0
Location
Ft. Worth, Texas
Finally got the alignment cams installed, as well as the steering stabilizer. The tires are on and the project is complete!

Tires delivered to my door!

IMG_2502_zps4f989057.jpg


New vs old (old still mounted to rim in this picture) -

IMG_2505_zpsf398d05e.jpg


Steering stabilizer (I realized after the fact that I installed it slightly wrong; the cylinders should go under the middle mount, not above, but I kind of like the way this looks, and it doesn't bind, so it shouldn't hurt anything to leave it) -

IMG_2515_zps77c926f0.jpg


Washed, waxed, and ready to roll!

IMG_2524_zpsc000db9c.jpg


IMG_2529_zps8cd69238.jpg


IMG_2531_zpse31ed4fb.jpg


IMG_2533_zps2a0c1578.jpg


IMG_2555_zps359976ad.jpg
 

Latest posts

Members online

Top