my retrofit light build

adrian94

New member
Joined
Jan 18, 2016
Messages
13
Reaction score
0
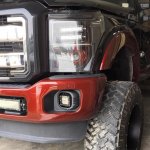
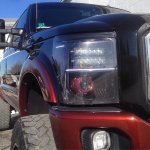
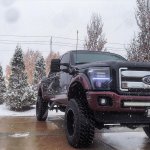
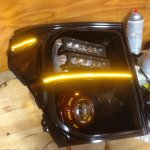
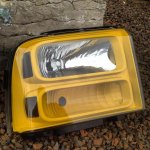
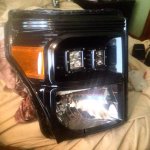
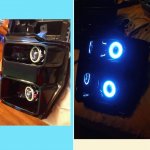
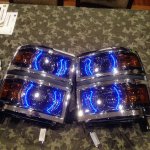
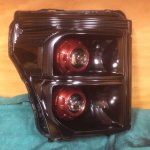
alright been asked to show a few pic of my lights i made, i used morimoto d2s projectors with apollo 3.0 shrouds painted to match bottom trim color on the truck. i have morimoto switchback led halos behind the projectors. up top is two 6" led single row led bars. also have morimoto switchback strips between top and bottom bowl and ontop of side reflector. housing is painted UH tuxedo black to match truck. heres a few pics, always have such a glare from the sun in all my pics! last pic is halfway during the build to show the yellow leds which are used for signals.
 

Attachments

  • h1.jpg
    h1.jpg
    130.5 KB · Views: 189
  • h2.jpg
    h2.jpg
    122.6 KB · Views: 207
  • h4.jpg
    h4.jpg
    184.7 KB · Views: 215
  • h3.jpg
    h3.jpg
    105.4 KB · Views: 238

6.0 Tech

Well-known member
Joined
Sep 9, 2015
Messages
3,485
Reaction score
101
Location
Mesa, AZ
how did you separate the lenses from the housing? I need to take mine apart and clean some chit out of them, but don't want to damage anything while doing it as I don't have a spare set.
 

adrian94

New member
Joined
Jan 18, 2016
Messages
13
Reaction score
0
put them in the oven around 200-220 degrees.. for about 10 mins, that will soften the seal, then work your way around the edge with a flat-head screwdriver/pry tool.. might take some more time in the oven every light ive done is different.
 

jwanck11

New member
Joined
Dec 31, 2014
Messages
192
Reaction score
0
Do not touch the inside of the lens!!!! Hell, dont even look at it wrong. It will scratch in a heartbeat. Compressed air is about it and hopefully whatever is in there does not drag across the surface and create a scratch.

GL!

Nice retro btw!!
 

6.0 Tech

Well-known member
Joined
Sep 9, 2015
Messages
3,485
Reaction score
101
Location
Mesa, AZ
Do not touch the inside of the lens!!!! Hell, dont even look at it wrong. It will scratch in a heartbeat. Compressed air is about it and hopefully whatever is in there does not drag across the surface and create a scratch.

GL!

Nice retro btw!!

Thanks for the info. The chit thats in there is from drilling holes for wig wags. Iwill use compressed air only now.
 

adrian94

New member
Joined
Jan 18, 2016
Messages
13
Reaction score
0
Thank you for the input, I appreciate it.

if your doing this on 6.0 style lights they come apart real easy since ford used different sealant back then... alot easier to take apart then the 6.7 lights! heres a set of light i did for an Amarillo edition truck
 

Attachments

  • h5.jpg
    h5.jpg
    125.5 KB · Views: 110

6.0 Tech

Well-known member
Joined
Sep 9, 2015
Messages
3,485
Reaction score
101
Location
Mesa, AZ
That looks food man. I am doing it on a set of eagle eyes 6.0 lights. Just use ckear silicone when going back together?
 

adrian94

New member
Joined
Jan 18, 2016
Messages
13
Reaction score
0
That looks food man. I am doing it on a set of eagle eyes 6.0 lights. Just use ckear silicone when going back together?

depends how much factory sealant is still there when you open them, sometimes it stays intact pretty good, other times gotta chip and tear the seal... when i gota put new sealant i use butyl rubber, available at most auto stores, also called butyl windscreen sealant... heats up in the oven, and seals the lights up nicely.
 

adrian94

New member
Joined
Jan 18, 2016
Messages
13
Reaction score
0
What does a set of lights like you have pictured for a 6.7 run price wise


Sent from my iPhone using Tapatalk

oooo well to actually do a set takes time and parts for custom stuff like that arent cheap... i usually just do lights for people locally because id rather deal in cash and not have to worry about shipping and stuff... but for the parts alone it cost me about a $1000 to do them
 

6.0 Tech

Well-known member
Joined
Sep 9, 2015
Messages
3,485
Reaction score
101
Location
Mesa, AZ
So after i put the butyl on i put it back in the oven for a few minutes to reseal? Tahnks for all yourhelp man. I typically dont do make pretty stuff, but these have been driving me nuts for a while
 

adrian94

New member
Joined
Jan 18, 2016
Messages
13
Reaction score
0
yeah put the butyl in the channel where the lense sits, push the lense back on and put in oven... then squish the lense back on till its seated nicely!
 

adrian94

New member
Joined
Jan 18, 2016
Messages
13
Reaction score
0
heres a few more builds ive done recently...
 

Attachments

  • h6.jpg
    h6.jpg
    103.8 KB · Views: 135
  • h7.jpg
    h7.jpg
    66.4 KB · Views: 125
  • h9.jpg
    h9.jpg
    145.9 KB · Views: 138
  • h8.jpg
    h8.jpg
    104.5 KB · Views: 126
  • h10.jpg
    h10.jpg
    103.1 KB · Views: 147

adrian94

New member
Joined
Jan 18, 2016
Messages
13
Reaction score
0
Where did you get those brackets for the single row leds on your headlights?


Sent from my iPhone using Tapatalk

Those where some quick ones i made just to do the mock-up and get the holes in the right position.. Made some new ones om the final build.. Just bent out of aluminum
 

ftast350

New member
Joined
Jun 22, 2014
Messages
421
Reaction score
0
Adrian! Get on the WCP train that you were just invited on! I posted these sexy things and people want! Especially cause your up here in the true white north!
 

Latest posts

Members online

Top