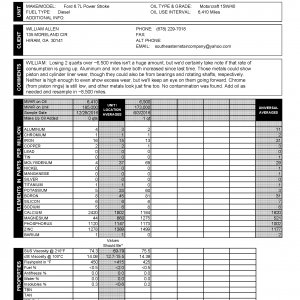
Rear bumper flush mount lights

BlueOx

New member
Joined
Nov 2, 2012
Messages
1,045
Reaction score
0
Ok I'm wanting to install some 2x2 flush mount lights in my rear bumper. Anybody have any tips or tricks for cutting the holes in the bumper? I wanna make sure I do this right the first time lol


Sent from the wild blue yonder....
 

BlueOx

New member
Joined
Nov 2, 2012
Messages
1,045
Reaction score
0
Dzchey21 did this on his truck. Came out looking awesome. Maybe he will chime in

.

I hope so! I just want to make sure I don't mess anything up. I know to double and triple check my measurements and all. I'm more worried about the cutting part


Sent from the wild blue yonder....
 

Powerstroked162

On Da Juice
Joined
May 18, 2011
Messages
10,069
Reaction score
0
Location
Wa. State
use a cutting wheel.

Yikes!

I'd suggest tracing your cut onto the bumper. Find the biggest hole-saw you can that will remove as much of the material as possible without exceeding your pattern. Then go in with a die grinder and a good single cut carbide tip and hog out the rest of the material in the corner. You could probably square up the corners off the hole-saw cut with a sawzall too. Hit it with a buffing wheel or a good rasp, light sand with emery cloth and bam, all done.

.
 

12stroker

New member
Joined
Oct 3, 2012
Messages
2,282
Reaction score
0
Location
Corpus Christi, TX
I know a guy that did his rigids like that and it came out great. And I am talking about a air cutting wheel which is the same as a die grinder.
 

Powerstroked162

On Da Juice
Joined
May 18, 2011
Messages
10,069
Reaction score
0
Location
Wa. State
Still a 4" wheel though, right? I'd be worried about the corner junctions. You almost always have to make a pass further then your marks to remove any amount of material in a pattern, worth cutting out. I'm too anal for that lol

A super easy way to do it if you don't have the tools or access to them, would be to just take your bumper to a machine shop and have it water jetted out. Most places with a table are reasonable. Setup is usually the money consumer
 

12stroker

New member
Joined
Oct 3, 2012
Messages
2,282
Reaction score
0
Location
Corpus Christi, TX
1FB-54AB77267ADB-1865-00000388B413CDF4_zpsfee92750.jpg

another member on here said he Grabbed a cheapo 3" electric cutoff tool at Harbor Freight. Used my dremel to smooth out the edges and hit the hole with some undercoating.
 

Powerstroked162

On Da Juice
Joined
May 18, 2011
Messages
10,069
Reaction score
0
Location
Wa. State
Looks good! The light bezel probably works in favor of the guy cutting. You know what I'm saying about the wheels marks though. PITA
 

BlueOx

New member
Joined
Nov 2, 2012
Messages
1,045
Reaction score
0
I'm just concerned with how hard the bumper material is. And wouldn't it being a chrome bumper make it even harder?


Sent from the wild blue yonder....
 

sagebel

Active member
Joined
May 19, 2011
Messages
1,111
Reaction score
5
Location
East Chatham, NY
I used a cheap 3" cutoff tool from HF. I used Bean LED flushmounts and they needed a hole just over 3" square so it worked well. I have a painted bumper so I taped everything so I could mark the holes. I placed mine just inside the outer backup sensor. Make sure the hole clears the wiring if you have the backup sensors. I placed my holes 2" inside the sensor and that is about as close as you can get. Once I had the hole for the lights cut and test fitted I used a self-centering drill bit to mark the holes and then finished them with a 1/4" bit. Found some stainless 1/4-20 button head capscrews at Lowes to mount them with. Hit the edges with some undercoating or paint to seal the bare metal before you install the lights.

1FB-54AB77267ADB-1865-00000388B413CDF4_zpsfee92750.jpg

8D5-1EE88705DEEF-1865-00000388C22EFB5E_zps7198128c.jpg
 
Last edited:

Koda22

New member
Joined
Mar 21, 2013
Messages
827
Reaction score
0
Location
Ruidoso, NM
Damn that looks good, I think I'm gonna have to try that....guess I'll be looking for some lights now...
 

Latest posts

Members online

Top