Austen
Member
- Joined
- Jan 5, 2014
- Messages
- 63
- Reaction score
- 0
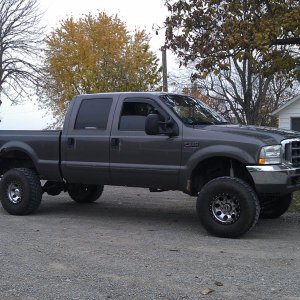
In between work and some free time on the weekends, I had an enjoyable spring and summer working on project Super Duty and taking care of a few things that needed to be done as well as performing some upgrades as well. I figured now would be good time to share those updates and post some corresponding photos!
Well let's get to it.
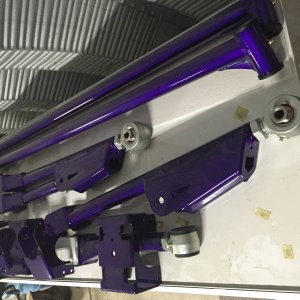
HNC Bumper
The most notable update is a new rear offroad bumper. It bugged me having the "hit and miss setup" with a nice one on the front and a stocker on the back. After several months of research and consideration, it was apparent I had found the right manufacture when I came across Hard Notched Customs, and independent shop based out of Vancouver WA. When I had it narrowed down to one or two other brands, I quickly found out that you could not have one "special ordered" or have any personal customization done. Including some poor customer service, I decided to spend a little more time researching as these bumpers are pricy and wanted to make sure I got the right thing.
Fortunately I did not pull the trigger too soon or I would have not found HNC. Their motto basically goes "You create the design; we build it." Joel and Matt were great to work with, will send you updates along the way during each stage of the build process as shown above. They offer competitive pricing and include rear auxiliary lights, license plates lights with the option to choose your finish type- things that aren't always offered with other manufactures.
Taking their standard SD rear bumper as template, I told them I wanted additional protection/coverage around the corners of the truck.
I was truly blown away when I saw it as it exceeded my expectations by far. I recommend them highly!
2008-2012 Tailgate
This was an unplanned mod and something that I was not thrilled about having to buy at first, but ended up turning out to be a chance to upgrade to the new style which so it turned out to be a win in the end.
The Back Story:
A little over a month ago while parking in a restaurant parking lot, I backed into a spot that had a big branch right behind the tailgate which ended up putting a huge dent in it. I made the mistake of leaving the truck in reverse after I shut it off- something that I've never done 99.9% of the time owning standard transmission vehicles all my life. I typically always put them back into first after parking. The thing with the ZF6 is that reverse is all the way to the left and up, so it can actually appear at a very quick glance that you're in 1st gear when in reality it's in reverse. Well, you can pretty much guess what happened when I got back in the truck and let the clutch out thinking it was in 1st. Won't make that mistake again!
Motorsport Tech BORA Wheel Spacers
For one who's obsessed about achieving his own particular stance, I called up my bud Lenny from Motorsport Tech to build a set of his hub centric BORA (bullet proof offroad adapters) for the truck to fill out the flares. The pinchweld mod had to be done due to the increased scrub radius but it came out looking good and sealed everything up properly with automotive undercoating.
Military Battery Terminals
Replaced all four batter connections with military style. The originals were tired and had some corrosion. Definitely a well worth mod as it has now aided in a stronger crank and will be beneficial for adding additional exterior lighting and accessories down the road.
6637 Intake
The truck had a new, yes new fortunately in the sense that it hadn't been installed very long, K&N intake system when I bought it so that had to go and be replaced with the almighty 6637 filter. Installed the filter onto the existing K&N intake pipe. Now I can sleep at night, lol.
Seat of the pants difference? I'll pretend you didn't even ask.
")
Sound difference? A little less turbo whistle and more of an intake roar.
Miscellaneous odds and ends:
-Oil/filter change
-Fuel filter change
-Replaced oil cooler seals
-New trailer 7 way plug
-Lubed suspension
-Hidden exhaust turn down
-Painted axle ends
-Replaced a buggered belt molding
-Valve cover wire loom wire replacement
She's definitely no new luxury ride and far from a show stopper but it's one tough truck that I enjoy fixing up and making mine.
Time for 40's!
What's next? A Tony Wildman chip a with 4 gauge pod pillar setup and a top rack similar to the one pictured below to carry a full sized 37" spare, lights and a high-lift.