My Custom interior conversion

powerstrokedkid87

Active member
Joined
Jul 11, 2011
Messages
2,824
Reaction score
0
Location
New Jersey
I figured i would share this interior build here as well......Here is the link to the thread on the nation...

Plans include:
Dye all gray plastics with black
New Black carpet
Recover black suede head liner
new sun visiors
some custom Hydro Graphics
Katzkins seat covers
rewire the interior accessories
relocate the methonal controler to the head liner
custom roof console for controler and switches
sound deadner

Heres the link....this started as a small simple change i was going to make to the seat covers....two months later, im finally starting to reasemble the truck....

http://powerstrokenation.com/forums/showthread.php?t=122874&highlight=
 

jdc753

New member
Joined
May 18, 2011
Messages
2,289
Reaction score
0
Location
Norton, MA
Glad to see you posting it up over here as well. Came out great changing over the plastics, and I am still in love with those hydrographics too!
 

powerstrokedkid87

Active member
Joined
Jul 11, 2011
Messages
2,824
Reaction score
0
Location
New Jersey
They look even better back on the door panels.....im spraying the console lid this week, so il get some pictures of that up also
 

jdgleason

Active member
Joined
May 18, 2011
Messages
7,993
Reaction score
0
Location
Fort Collins, CO
Dude... thats sweet. I like the headliner.... how did you do that? I guess what was your process, and where did you get the suede?
 

powerstrokedkid87

Active member
Joined
Jul 11, 2011
Messages
2,824
Reaction score
0
Location
New Jersey
i originally got a kit from Head liner outlet . com...........but it was a big too small, and kinda junk....

Ended up getting a kit from ebay, i pealed off the old headliner fabric, scubbed anything left behind off with a wire brush, vacumed the whole thing clean:

Sprayed the adhesive that came with the kit, and carefully laid the new suede in place, theres a few spots that are not exactly perfect, but they get covered with trim, or are so small i am the only one that would notice it.

For the cost of 75$ for everything i couldnt complain
 

Keanoknick

New member
Joined
Jun 7, 2011
Messages
239
Reaction score
0
Location
Fort Worth, Texas
That looks great, can't wait to see it all done. I really need to do my headliner in black suede too. I converted my whole interior black a little over a year ago, buy ran out of cash and didn't do the headliner, so it's still the factory tan. Doesn't look bad, but not as nice as yours. That and i need new seat belts for the middle rear seats.
 

powerstrokedkid87

Active member
Joined
Jul 11, 2011
Messages
2,824
Reaction score
0
Location
New Jersey
what are you doing with your factory seat covers?

They have been sold along with the carpet

That looks great, can't wait to see it all done. I really need to do my headliner in black suede too. I converted my whole interior black a little over a year ago, buy ran out of cash and didn't do the headliner, so it's still the factory tan. Doesn't look bad, but not as nice as yours. That and i need new seat belts for the middle rear seats.

Thanks, yea i tried to keep this one with in a budget being that my motor build got a little out of control. As far as the head liner, for the cost of the suede and kit on ebay, i figure it was worth the 75$, that way even if i screwed it up, i could still take it somewhere and have them cover it but i got lucky and it turned out pretty good.
 

Hotrodtractor

Moderator
Joined
May 18, 2011
Messages
4,934
Reaction score
14
Location
Mingo, Ohio
That is sweet. I don't suppose that I could get you to post those pictures and an overview over here with updates as you finish could I? It would be excellent tech that would help this place grow even faster and answer lots of questions for people looking to do this. I know I have talked about redoing the interior in my truck and I will most likely be referencing this for tips and tricks.

Thanks.
 

powerstrokedkid87

Active member
Joined
Jul 11, 2011
Messages
2,824
Reaction score
0
Location
New Jersey
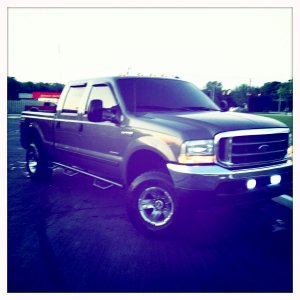
Here is a brief catch up of what i have done so far: I started this whole thing to be a simple seat cover change that has clearly evoloved into much much more! as i stated at the beggining the idea of this conversion was to make a completley custom interior the way i wanted it. I really liked the Harley interior but could not make sense of spening the kind of money on the factory parts. I realized that this could get costly, and i would tell anyone that a fair budget to do all of this would be somehwere in the range of $2500 depending on how crazy you go. Also Keep in mind that i have kept the interior of this truck flawless since the day i bought it new in 06, so i was able to make up some of the cost by selling my entire interior factory seats, carpets, seat belts, as well as the fabric i removed from my factory head liner. I completed all of this myself with the help of my brother for the wiring (because i really did not have the patients) and a few other people from work (Like my finisher) to help me spray the panels in the shop. The more detailed list of the items i wanted to accomplish:
-Remove all of the gray plastic from the factory and paint it to look factory and last:
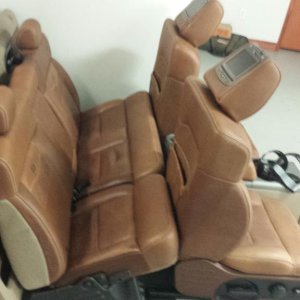
-Custom seat covers
-Suede Head liner
-remove the Snow performance controler from the steering colum and put it in an overhad cosole
-re wire all the guages the correct way so i can easily remove them if needed
-hook up fuel pressure to my cts monitor
-wire up the 2010 tailgate cam to my aftermarket head unit
-put secondary camera to my cts monitor
-pre-wire for led strob lights (fire department)
-pre wire all the roof console switches to behind my rear seat
-prewire for all the LED under body lighting
the idea to prewire everything is to make it very simple to install items down the road. We will be preset for NOS, emergency lighting, and a few other accessories as needed

Interior from the start:
1.jpg

2.jpg

5.jpg


after seats where reemoved
4.jpg

7.jpg


door panels and carpet were next followed by head liner
11.jpg

13.jpg

10.jpg


clear visable why i wanted to rewire the truck!
Here is my new interior
13.jpg


factory carpet
14.jpg


I opted to spend the money for factory replacement carpet because i wanted a perfect fit. I have a friend who was able to get it for me at employee cost so it mad sense and well worth it. Even if i had to pay retail i would still go this route becasue it was much simpler, and fit perfect with most of the precuts already in and the backing applied

New carpet (Harley edition)
DSC01138.jpg


Next i dissasembled all the seats and removed the factory covers
DSC01132.jpg

DSC01135.jpg

DSC01137.jpg

DSC01134.jpg

DSC01136.jpg
 

powerstrokedkid87

Active member
Joined
Jul 11, 2011
Messages
2,824
Reaction score
0
Location
New Jersey
Next was to remove the fabric from the factory head liner: I did this by carefully pealing a corner up, then slowly with patients working the factory off the head board. I was able to get most of the foam off with the fabric, but for the areas where i couldnt, i used a wire brush, then vacumed the entire head board clean.

DSC01143.jpg

DSC01144.jpg

DSC01145.jpg

DSC01146.jpg

DSC01147.jpg


while i was waiting for the fabric to come in, which i got from ebay (well work it, 75$ for 3 yards of material and 2 cans of adhesive) i decided i would try to cover it myself, rather than spend 250 and have it covered. I figured if it came out horrible, i would send it out to get redone. It was time to paint all the plastics. Prior to painting, i had a spare dash that i was able to test 2 products on that i was thinking of using. I tested the duplicolor, and the Colorbond paint.

test1.jpg

test3.jpg

The duplicolr was too glossy for me, and from what i heard about it, flaked off easy. Aftre putting tape on it and pealing, the duplicolor pulled off the plastic. The color bond however was a nice satin finish with a good black color, that still showed all the grain in the plastic. That is what i was after, a real factory look. Now Here is where i made an error. I did not use the adhesion promotor the first time i sprayed everything. There for as i was moving pieces around, it all started scratching off. Being that i did not want to half ass it, i stripped all the pieces back down and started over. Color bond was great, and worked with me to get me all the new material, and the adhesion promoter. I stripped everything down with lacquer thinner, cleaned everything real well, and applied adhesion promoter, and the paint. After i was done stripping all the parts, we tested a piece with the promoter. Let it set 24 hours, and i took my keys and could not scratch this stuff off. It was perfect!

I also removed the wood grain peices..i had a special idea for those

Here is the painting pictures
8.jpg

DSC01148.jpg

DSC01150.jpg

DSC01155.jpg

DSC01160.jpg

DSC01161.jpg


they really look awesome andd factory
 

powerstrokedkid87

Active member
Joined
Jul 11, 2011
Messages
2,824
Reaction score
0
Location
New Jersey
While waiting for new material and parts ect. I opted to sound deaden the cab since i had everything out. I used FatMat, mainly because a friend used it recently and i liked how it worked for him, but also seemed like most materials are faily generic, with out doing a test on each one,and this one seemed priced fairly similar to everything else.

Here is some pictures of my brother helping with the wiring, and the fatmat
IMG_0709.jpg

IMG_0710.jpg

IMG_0712.jpg

IMG_0713.jpg

IMG_0717.jpg

IMG_0717-1.jpg

IMG_0763.jpg


IMG_0768.jpg


we kept everything pretty organized while wiring, he ran the wired behind the rails in the cab to keep it nice and clean, and used grommets on all the holes we had to drill to keep wired from chaffing. Also had a list of what was going where to keep in organized
IMG_0769.jpg

IMG_0775.jpg


Also found some time to recover the head liner once the material cam in. Wasnt as hard as i thought, just takes patients. I was very happy with how it came out since it was the first time i did it. There is a few spots that are not perfect, but most of them are covered up, or im the only one who would notice it.
IMG_0695.jpg

IMG_0700.jpg

IMG_0696.jpg

IMG_0701.jpg

IMG_0699.jpg
 

powerstrokedkid87

Active member
Joined
Jul 11, 2011
Messages
2,824
Reaction score
0
Location
New Jersey
now that i had the plastics painted, and the head liner done, i was able to get the head liner in place and put the rear pillar in, as well as the seat belts in the back. I also put the carpet in, but still have to trim the opening for the 4x4 lever

DSC01163.jpg

DSC01164.jpg

IMG_0798.jpg

DSC01167.jpg


and the most recent was the rear door panels
IMG_0819.jpg

IMG_0818.jpg

IMG_0817.jpg


Now the Wood peices for the dash and the door panels and console lid i sent out to a new company we are doing some work with, they took my wood grain pieces and hydrocoated them with a black and candy red carbon fiber
IMG_20120222_174920.jpg

IMG_20120221_183225.jpg


This weekend the dash will go in, and i will start to fabricate the roof console
here is what i think the design of the roof console will be like
IMG_0822.jpg
 

11STROKER

New member
Joined
May 18, 2011
Messages
615
Reaction score
0
Location
Monroe, GA
I figured i would share this interior build here as well......Here is the link to the thread on the nation...

Plans include:
Dye all gray plastics with black
New Black carpet
Recover black suede head liner
new sun visiors
some custom Hydro Graphics
Katzkins seat covers
rewire the interior accessories
relocate the methonal controler to the head liner
custom roof console for controler and switches
sound deadner

Heres the link....this started as a small simple change i was going to make to the seat covers....two months later, im finally starting to reasemble the truck....

http://powerstrokenation.com/forums/showthread.php?t=122874&highlight=

thats very sharp looking. i like it
 

Latest posts

Members online

Top